- 향상된 기능: AutoGen 에이전트에 지속성, 스트리밍, 단기 및 장기 메모리 등을 추가할 수 있습니다.
- 멀티 에이전트 시스템: 개별 에이전트가 서로 다른 프레임워크로 구축된 멀티 에이전트 시스템을 빌드할 수 있습니다.
- 프로덕션 배포: 통합된 솔루션을 LangSmith에 배포하여 확장 가능한 프로덕션 환경에서 사용할 수 있습니다.
사전 요구사항
- Python 3.9+
- Autogen:
pip install autogen - LangGraph:
pip install langgraph - OpenAI API 키
설정
환경을 설정합니다:Copy
import getpass
import os


def _set_env(var: str):
    if not os.environ.get(var):
        os.environ[var] = getpass.getpass(f"{var}: ")


_set_env("OPENAI_API_KEY")
1. AutoGen 에이전트 정의
코드를 실행할 수 있는 AutoGen 에이전트를 생성합니다. 이 예제는 AutoGen의 공식 튜토리얼에서 발췌한 것입니다:Copy
import autogen
import os

config_list = [{"model": "gpt-4o", "api_key": os.environ["OPENAI_API_KEY"]}]

llm_config = {
    "timeout": 600,
    "cache_seed": 42,
    "config_list": config_list,
    "temperature": 0,
}

autogen_agent = autogen.AssistantAgent(
    name="assistant",
    llm_config=llm_config,
)

user_proxy = autogen.UserProxyAgent(
    name="user_proxy",
    human_input_mode="NEVER",
    max_consecutive_auto_reply=10,
    is_termination_msg=lambda x: x.get("content", "").rstrip().endswith("TERMINATE"),
    code_execution_config={
        "work_dir": "web",
        "use_docker": False,
    },  # Please set use_docker=True if docker is available to run the generated code. Using docker is safer than running the generated code directly.
    llm_config=llm_config,
    system_message="Reply TERMINATE if the task has been solved at full satisfaction. Otherwise, reply CONTINUE, or the reason why the task is not solved yet.",
)
2. 그래프 생성
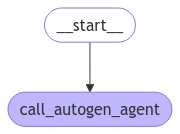
이제 AutoGen 에이전트를 호출하는 LangGraph 챗봇 그래프를 생성합니다.Copy
from langchain_core.messages import convert_to_openai_messages
from langgraph.graph import StateGraph, MessagesState, START
from langgraph.checkpoint.memory import MemorySaver

def call_autogen_agent(state: MessagesState):
    # Convert LangGraph messages to OpenAI format for AutoGen
    messages = convert_to_openai_messages(state["messages"])

    # Get the last user message
    last_message = messages[-1]

    # Pass previous message history as context (excluding the last message)
    carryover = messages[:-1] if len(messages) > 1 else []

    # Initiate chat with AutoGen
    response = user_proxy.initiate_chat(
        autogen_agent,
        message=last_message,
        carryover=carryover
    )

    # Extract the final response from the agent
    final_content = response.chat_history[-1]["content"]

    # Return the response in LangGraph format
    return {"messages": {"role": "assistant", "content": final_content}}

# Create the graph with memory for persistence
checkpointer = MemorySaver()

# Build the graph
builder = StateGraph(MessagesState)
builder.add_node("autogen", call_autogen_agent)
builder.add_edge(START, "autogen")

# Compile with checkpointer for persistence
graph = builder.compile(checkpointer=checkpointer)
Copy
from IPython.display import display, Image

display(Image(graph.get_graph().draw_mermaid_png()))

3. 로컬에서 그래프 테스트
LangSmith에 배포하기 전에 로컬에서 그래프를 테스트할 수 있습니다:Copy
# pass the thread ID to persist agent outputs for future interactions
config = {"configurable": {"thread_id": "1"}}

for chunk in graph.stream(
    {
        "messages": [
            {
                "role": "user",
                "content": "Find numbers between 10 and 30 in fibonacci sequence",
            }
        ]
    },
    config,
):
    print(chunk)
Copy
user_proxy (to assistant):

Find numbers between 10 and 30 in fibonacci sequence

--------------------------------------------------------------------------------
assistant (to user_proxy):

To find numbers between 10 and 30 in the Fibonacci sequence, we can generate the Fibonacci sequence and check which numbers fall within this range. Here's a plan:

1. Generate Fibonacci numbers starting from 0.
2. Continue generating until the numbers exceed 30.
3. Collect and print the numbers that are between 10 and 30.

...
Copy
for chunk in graph.stream(
    {
        "messages": [
            {
                "role": "user",
                "content": "Multiply the last number by 3",
            }
        ]
    },
    config,
):
    print(chunk)
Copy
user_proxy (to assistant):

Multiply the last number by 3
Context:
Find numbers between 10 and 30 in fibonacci sequence
The Fibonacci numbers between 10 and 30 are 13 and 21.

These numbers are part of the Fibonacci sequence, which is generated by adding the two preceding numbers to get the next number, starting from 0 and 1.

The sequence goes: 0, 1, 1, 2, 3, 5, 8, 13, 21, 34, ...

As you can see, 13 and 21 are the only numbers in this sequence that fall between 10 and 30.

TERMINATE

--------------------------------------------------------------------------------
assistant (to user_proxy):

The last number in the Fibonacci sequence between 10 and 30 is 21. Multiplying 21 by 3 gives:

21 * 3 = 63

TERMINATE

--------------------------------------------------------------------------------
{'call_autogen_agent': {'messages': {'role': 'assistant', 'content': 'The last number in the Fibonacci sequence between 10 and 30 is 21. Multiplying 21 by 3 gives:\n\n21 * 3 = 63\n\nTERMINATE'}}}
4. 배포 준비
LangSmith에 배포하려면 다음과 같은 파일 구조를 생성합니다:Copy
my-autogen-agent/
├── agent.py          # Your main agent code
├── requirements.txt  # Python dependencies
└── langgraph.json   # LangGraph configuration
- agent.py
- requirements.txt
- langgraph.json
Copy
import os
import autogen
from langchain_core.messages import convert_to_openai_messages
from langgraph.graph import StateGraph, MessagesState, START
from langgraph.checkpoint.memory import MemorySaver

# AutoGen configuration
config_list = [{"model": "gpt-4o", "api_key": os.environ["OPENAI_API_KEY"]}]

llm_config = {
    "timeout": 600,
    "cache_seed": 42,
    "config_list": config_list,
    "temperature": 0,
}

# Create AutoGen agents
autogen_agent = autogen.AssistantAgent(
    name="assistant",
    llm_config=llm_config,
)

user_proxy = autogen.UserProxyAgent(
    name="user_proxy",
    human_input_mode="NEVER",
    max_consecutive_auto_reply=10,
    is_termination_msg=lambda x: x.get("content", "").rstrip().endswith("TERMINATE"),
    code_execution_config={
        "work_dir": "/tmp/autogen_work",
        "use_docker": False,
    },
    llm_config=llm_config,
    system_message="Reply TERMINATE if the task has been solved at full satisfaction.",
)

def call_autogen_agent(state: MessagesState):
    """Node function that calls the AutoGen agent"""
    messages = convert_to_openai_messages(state["messages"])
    last_message = messages[-1]
    carryover = messages[:-1] if len(messages) > 1 else []

    response = user_proxy.initiate_chat(
        autogen_agent,
        message=last_message,
        carryover=carryover
    )

    final_content = response.chat_history[-1]["content"]
    return {"messages": {"role": "assistant", "content": final_content}}

# Create and compile the graph
def create_graph():
    checkpointer = MemorySaver()
    builder = StateGraph(MessagesState)
    builder.add_node("autogen", call_autogen_agent)
    builder.add_edge(START, "autogen")
    return builder.compile(checkpointer=checkpointer)

# Export the graph for LangSmith
graph = create_graph()
Copy
langgraph>=0.1.0
pyautogen>=0.2.0
langchain-core>=0.1.0
langchain-openai>=0.0.5
Copy
{
"dependencies": ["."],
"graphs": {
    "autogen_agent": "./agent.py:graph"
},
"env": ".env"
}
5. LangSmith에 배포
LangSmith CLI를 사용하여 그래프를 배포합니다:Copy
pip install -U langgraph-cli
Copy
langgraph deploy --config langgraph.json
Connect these docs programmatically to Claude, VSCode, and more via MCP for real-time answers.

