이 가이드에서는 서브그래프를 사용하는 메커니즘을 설명합니다. 서브그래프는 다른 그래프에서 노드로 사용되는 그래프입니다. 서브그래프는 다음과 같은 경우에 유용합니다:
  • 멀티 에이전트 시스템 구축
  • 여러 그래프에서 노드 집합 재사용
  • 분산 개발: 서로 다른 팀이 그래프의 각 부분을 독립적으로 작업하고자 할 때, 각 부분을 서브그래프로 정의할 수 있으며, 서브그래프 인터페이스(입력 및 출력 스키마)만 준수한다면 부모 그래프는 서브그래프의 세부 사항을 알 필요 없이 구축할 수 있습니다
서브그래프를 추가할 때는 부모 그래프와 서브그래프가 통신하는 방법을 정의해야 합니다:

설정

npm install @langchain/langgraph
LangGraph 개발을 위한 LangSmith 설정 LangSmith에 가입하여 LangGraph 프로젝트의 문제를 신속하게 파악하고 성능을 개선하세요. LangSmith를 사용하면 트레이스 데이터를 활용하여 LangGraph로 구축한 LLM 앱을 디버깅, 테스트 및 모니터링할 수 있습니다 — 시작하는 방법에 대한 자세한 내용은 여기에서 확인하세요.

노드에서 그래프 호출하기

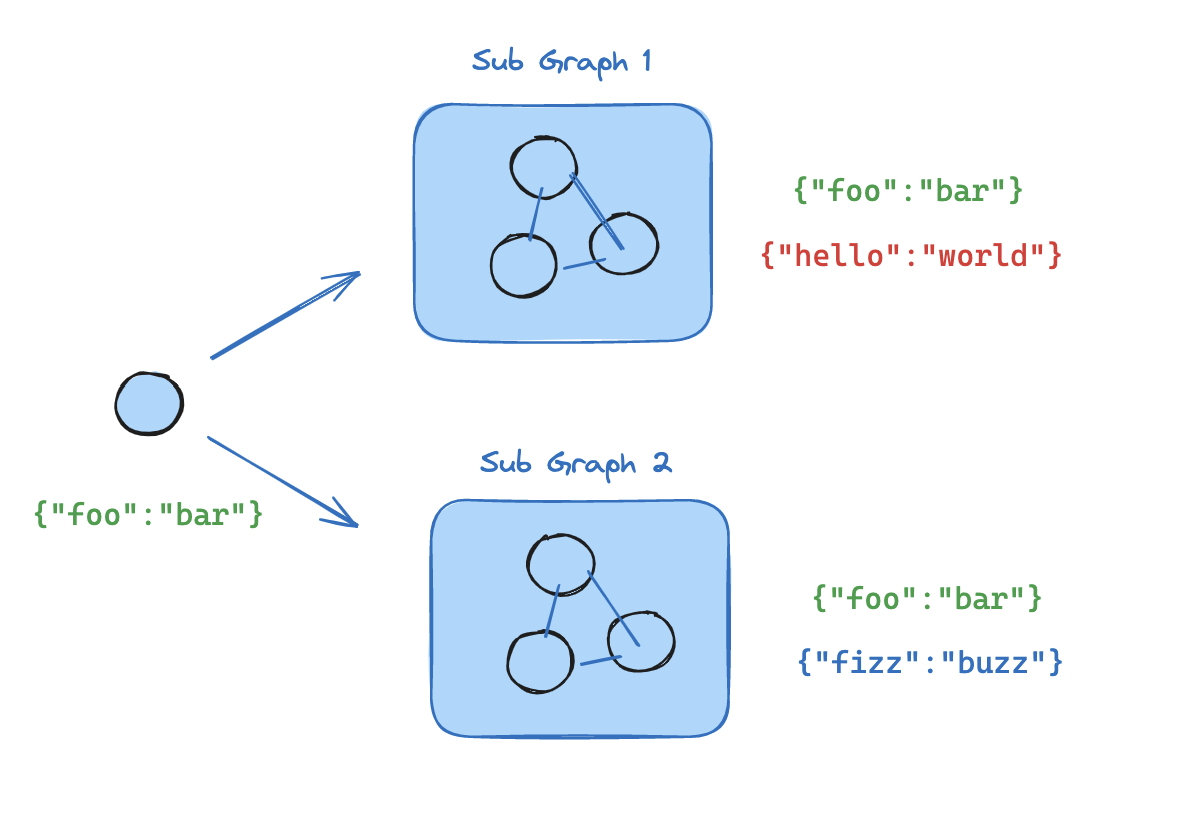
서브그래프를 구현하는 간단한 방법은 다른 그래프의 노드 내부에서 그래프를 호출하는 것입니다. 이 경우 서브그래프는 부모 그래프와 완전히 다른 스키마를 가질 수 있습니다(공유 키 없음). 예를 들어, 멀티 에이전트 시스템의 각 에이전트에 대해 비공개 메시지 히스토리를 유지하고 싶을 수 있습니다. 애플리케이션에서 이러한 경우에 해당한다면, 서브그래프를 호출하는 노드 함수를 정의해야 합니다. 이 함수는 서브그래프를 호출하기 전에 입력(부모) 상태를 서브그래프 상태로 변환하고, 결과를 다시 부모 상태로 변환한 후 노드에서 상태 업데이트를 반환해야 합니다.
import { StateGraph, START } from "@langchain/langgraph";
import * as z from "zod";

const SubgraphState = z.object({
  bar: z.string(),
});

// Subgraph
const subgraphBuilder = new StateGraph(SubgraphState)
  .addNode("subgraphNode1", (state) => {
    return { bar: "hi! " + state.bar };
  })
  .addEdge(START, "subgraphNode1");

const subgraph = subgraphBuilder.compile();

// Parent graph
const State = z.object({
  foo: z.string(),
});

// Transform the state to the subgraph state and back
const builder = new StateGraph(State)
  .addNode("node1", async (state) => {
    const subgraphOutput = await subgraph.invoke({ bar: state.foo });
    return { foo: subgraphOutput.bar };
  })
  .addEdge(START, "node1");

const graph = builder.compile();
import { StateGraph, START } from "@langchain/langgraph";
import * as z from "zod";

// Define subgraph
const SubgraphState = z.object({
  // note that none of these keys are shared with the parent graph state
  bar: z.string(),
  baz: z.string(),
});

const subgraphBuilder = new StateGraph(SubgraphState)
  .addNode("subgraphNode1", (state) => {
    return { baz: "baz" };
  })
  .addNode("subgraphNode2", (state) => {
    return { bar: state.bar + state.baz };
  })
  .addEdge(START, "subgraphNode1")
  .addEdge("subgraphNode1", "subgraphNode2");

const subgraph = subgraphBuilder.compile();

// Define parent graph
const ParentState = z.object({
  foo: z.string(),
});

const builder = new StateGraph(ParentState)
  .addNode("node1", (state) => {
    return { foo: "hi! " + state.foo };
  })
  .addNode("node2", async (state) => {
    const response = await subgraph.invoke({ bar: state.foo }); // (1)!
    return { foo: response.bar }; // (2)!
  })
  .addEdge(START, "node1")
  .addEdge("node1", "node2");

const graph = builder.compile();

for await (const chunk of await graph.stream(
  { foo: "foo" },
  { subgraphs: true }
)) {
  console.log(chunk);
}
  1. 상태를 서브그래프 상태로 변환합니다
  2. 응답을 다시 부모 상태로 변환합니다
[[], { node1: { foo: 'hi! foo' } }]
[['node2:9c36dd0f-151a-cb42-cbad-fa2f851f9ab7'], { subgraphNode1: { baz: 'baz' } }]
[['node2:9c36dd0f-151a-cb42-cbad-fa2f851f9ab7'], { subgraphNode2: { bar: 'hi! foobaz' } }]
[[], { node2: { foo: 'hi! foobaz' } }]
다음은 두 단계의 서브그래프를 사용하는 예제입니다: parent -> child -> grandchild.
import { StateGraph, START, END } from "@langchain/langgraph";
import * as z from "zod";

// Grandchild graph
const GrandChildState = z.object({
  myGrandchildKey: z.string(),
});

const grandchild = new StateGraph(GrandChildState)
  .addNode("grandchild1", (state) => {
    // NOTE: child or parent keys will not be accessible here
    return { myGrandchildKey: state.myGrandchildKey + ", how are you" };
  })
  .addEdge(START, "grandchild1")
  .addEdge("grandchild1", END);

const grandchildGraph = grandchild.compile();

// Child graph
const ChildState = z.object({
  myChildKey: z.string(),
});

const child = new StateGraph(ChildState)
  .addNode("child1", async (state) => {
    // NOTE: parent or grandchild keys won't be accessible here
    const grandchildGraphInput = { myGrandchildKey: state.myChildKey }; // (1)!
    const grandchildGraphOutput = await grandchildGraph.invoke(grandchildGraphInput);
    return { myChildKey: grandchildGraphOutput.myGrandchildKey + " today?" }; // (2)!
  }) // (3)!
  .addEdge(START, "child1")
  .addEdge("child1", END);

const childGraph = child.compile();

// Parent graph
const ParentState = z.object({
  myKey: z.string(),
});

const parent = new StateGraph(ParentState)
  .addNode("parent1", (state) => {
    // NOTE: child or grandchild keys won't be accessible here
    return { myKey: "hi " + state.myKey };
  })
  .addNode("child", async (state) => {
    const childGraphInput = { myChildKey: state.myKey }; // (4)!
    const childGraphOutput = await childGraph.invoke(childGraphInput);
    return { myKey: childGraphOutput.myChildKey }; // (5)!
  }) // (6)!
  .addNode("parent2", (state) => {
    return { myKey: state.myKey + " bye!" };
  })
  .addEdge(START, "parent1")
  .addEdge("parent1", "child")
  .addEdge("child", "parent2")
  .addEdge("parent2", END);

const parentGraph = parent.compile();

for await (const chunk of await parentGraph.stream(
  { myKey: "Bob" },
  { subgraphs: true }
)) {
  console.log(chunk);
}
  1. 상태를 자식 상태 채널(myChildKey)에서 손자 상태 채널(myGrandchildKey)로 변환합니다
  2. 상태를 손자 상태 채널(myGrandchildKey)에서 다시 자식 상태 채널(myChildKey)로 변환합니다
  3. 여기서는 컴파일된 그래프(grandchildGraph)만 전달하는 대신 함수를 전달합니다
  4. 상태를 부모 상태 채널(myKey)에서 자식 상태 채널(myChildKey)로 변환합니다
  5. 상태를 자식 상태 채널(myChildKey)에서 다시 부모 상태 채널(myKey)로 변환합니다
  6. 여기서는 컴파일된 그래프(childGraph)만 전달하는 대신 함수를 전달합니다
[[], { parent1: { myKey: 'hi Bob' } }]
[['child:2e26e9ce-602f-862c-aa66-1ea5a4655e3b', 'child1:781bb3b1-3971-84ce-810b-acf819a03f9c'], { grandchild1: { myGrandchildKey: 'hi Bob, how are you' } }]
[['child:2e26e9ce-602f-862c-aa66-1ea5a4655e3b'], { child1: { myChildKey: 'hi Bob, how are you today?' } }]
[[], { child: { myKey: 'hi Bob, how are you today?' } }]
[[], { parent2: { myKey: 'hi Bob, how are you today? bye!' } }]

그래프를 노드로 추가하기

부모 그래프와 서브그래프가 스키마의 공유 상태 키(채널)를 통해 통신할 수 있는 경우, 그래프를 다른 그래프의 노드로 추가할 수 있습니다. 예를 들어, 멀티 에이전트 시스템에서는 에이전트들이 종종 공유된 메시지 키를 통해 통신합니다. SQL agent graph 서브그래프가 부모 그래프와 상태 키를 공유하는 경우, 다음 단계에 따라 그래프에 추가할 수 있습니다:
  1. 서브그래프 워크플로우(아래 예제의 subgraphBuilder)를 정의하고 컴파일합니다
  2. 부모 그래프 워크플로우를 정의할 때 .addNode 메서드에 컴파일된 서브그래프를 전달합니다
import { StateGraph, START } from "@langchain/langgraph";
import * as z from "zod";

const State = z.object({
  foo: z.string(),
});

// Subgraph
const subgraphBuilder = new StateGraph(State)
  .addNode("subgraphNode1", (state) => {
    return { foo: "hi! " + state.foo };
  })
  .addEdge(START, "subgraphNode1");

const subgraph = subgraphBuilder.compile();

// Parent graph
const builder = new StateGraph(State)
  .addNode("node1", subgraph)
  .addEdge(START, "node1");

const graph = builder.compile();
import { StateGraph, START } from "@langchain/langgraph";
import * as z from "zod";

// Define subgraph
const SubgraphState = z.object({
  foo: z.string(),  // (1)!
  bar: z.string(),  // (2)!
});

const subgraphBuilder = new StateGraph(SubgraphState)
  .addNode("subgraphNode1", (state) => {
    return { bar: "bar" };
  })
  .addNode("subgraphNode2", (state) => {
    // note that this node is using a state key ('bar') that is only available in the subgraph
    // and is sending update on the shared state key ('foo')
    return { foo: state.foo + state.bar };
  })
  .addEdge(START, "subgraphNode1")
  .addEdge("subgraphNode1", "subgraphNode2");

const subgraph = subgraphBuilder.compile();

// Define parent graph
const ParentState = z.object({
  foo: z.string(),
});

const builder = new StateGraph(ParentState)
  .addNode("node1", (state) => {
    return { foo: "hi! " + state.foo };
  })
  .addNode("node2", subgraph)
  .addEdge(START, "node1")
  .addEdge("node1", "node2");

const graph = builder.compile();

for await (const chunk of await graph.stream({ foo: "foo" })) {
  console.log(chunk);
}
  1. 이 키는 부모 그래프 상태와 공유됩니다
  2. 이 키는 SubgraphState에만 있으며 부모 그래프에는 보이지 않습니다
{ node1: { foo: 'hi! foo' } }
{ node2: { foo: 'hi! foobar' } }

영속성 추가

부모 그래프를 컴파일할 때만 체크포인터를 제공하면 됩니다. LangGraph는 자동으로 체크포인터를 자식 서브그래프로 전파합니다.
import { StateGraph, START, MemorySaver } from "@langchain/langgraph";
import * as z from "zod";

const State = z.object({
  foo: z.string(),
});

// Subgraph
const subgraphBuilder = new StateGraph(State)
  .addNode("subgraphNode1", (state) => {
    return { foo: state.foo + "bar" };
  })
  .addEdge(START, "subgraphNode1");

const subgraph = subgraphBuilder.compile();

// Parent graph
const builder = new StateGraph(State)
  .addNode("node1", subgraph)
  .addEdge(START, "node1");

const checkpointer = new MemorySaver();
const graph = builder.compile({ checkpointer });
서브그래프가 자체 메모리를 가지도록 하려면, 적절한 체크포인터 옵션으로 컴파일할 수 있습니다. 이는 멀티 에이전트 시스템에서 에이전트들이 내부 메시지 히스토리를 추적하고 싶을 때 유용합니다:
const subgraphBuilder = new StateGraph(...)
const subgraph = subgraphBuilder.compile({ checkpointer: true });

서브그래프 상태 보기

영속성을 활성화하면, 적절한 메서드를 통해 그래프 상태를 검사(체크포인트)할 수 있습니다. 서브그래프 상태를 보려면 subgraphs 옵션을 사용할 수 있습니다. graph.getState(config)를 통해 그래프 상태를 검사할 수 있습니다. 서브그래프 상태를 보려면 graph.getState(config, { subgraphs: true })를 사용할 수 있습니다.
중단되었을 때만 사용 가능 서브그래프 상태는 서브그래프가 중단되었을 때만 볼 수 있습니다. 그래프를 재개하면 서브그래프 상태에 액세스할 수 없습니다.
import { StateGraph, START, MemorySaver, interrupt, Command } from "@langchain/langgraph";
import * as z from "zod";

const State = z.object({
  foo: z.string(),
});

// Subgraph
const subgraphBuilder = new StateGraph(State)
  .addNode("subgraphNode1", (state) => {
    const value = interrupt("Provide value:");
    return { foo: state.foo + value };
  })
  .addEdge(START, "subgraphNode1");

const subgraph = subgraphBuilder.compile();

// Parent graph
const builder = new StateGraph(State)
  .addNode("node1", subgraph)
  .addEdge(START, "node1");

const checkpointer = new MemorySaver();
const graph = builder.compile({ checkpointer });

const config = { configurable: { thread_id: "1" } };

await graph.invoke({ foo: "" }, config);
const parentState = await graph.getState(config);
const subgraphState = (await graph.getState(config, { subgraphs: true })).tasks[0].state; // (1)!

// resume the subgraph
await graph.invoke(new Command({ resume: "bar" }), config);

서브그래프 출력 스트리밍

스트리밍 출력에 서브그래프의 출력을 포함하려면, 부모 그래프의 stream 메서드에서 subgraphs 옵션을 설정할 수 있습니다. 이렇게 하면 부모 그래프와 모든 서브그래프의 출력이 스트리밍됩니다.
for await (const chunk of await graph.stream(
  { foo: "foo" },
  {
    subgraphs: true, // (1)!
    streamMode: "updates",
  }
)) {
  console.log(chunk);
}
  1. 서브그래프의 출력을 스트리밍하려면 subgraphs: true를 설정하세요.
import { StateGraph, START } from "@langchain/langgraph";
import * as z from "zod";

// Define subgraph
const SubgraphState = z.object({
  foo: z.string(),
  bar: z.string(),
});

const subgraphBuilder = new StateGraph(SubgraphState)
  .addNode("subgraphNode1", (state) => {
    return { bar: "bar" };
  })
  .addNode("subgraphNode2", (state) => {
    // note that this node is using a state key ('bar') that is only available in the subgraph
    // and is sending update on the shared state key ('foo')
    return { foo: state.foo + state.bar };
  })
  .addEdge(START, "subgraphNode1")
  .addEdge("subgraphNode1", "subgraphNode2");

const subgraph = subgraphBuilder.compile();

// Define parent graph
const ParentState = z.object({
  foo: z.string(),
});

const builder = new StateGraph(ParentState)
  .addNode("node1", (state) => {
    return { foo: "hi! " + state.foo };
  })
  .addNode("node2", subgraph)
  .addEdge(START, "node1")
  .addEdge("node1", "node2");

const graph = builder.compile();

for await (const chunk of await graph.stream(
  { foo: "foo" },
  {
    streamMode: "updates",
    subgraphs: true, // (1)!
  }
)) {
  console.log(chunk);
}
  1. 서브그래프의 출력을 스트리밍하려면 subgraphs: true를 설정하세요.
[[], { node1: { foo: 'hi! foo' } }]
[['node2:e58e5673-a661-ebb0-70d4-e298a7fc28b7'], { subgraphNode1: { bar: 'bar' } }]
[['node2:e58e5673-a661-ebb0-70d4-e298a7fc28b7'], { subgraphNode2: { foo: 'hi! foobar' } }]
[[], { node2: { foo: 'hi! foobar' } }]

Connect these docs programmatically to Claude, VSCode, and more via MCP for real-time answers.
I