

개요
LLM이 가능하게 하는 가장 강력한 애플리케이션 중 하나는 정교한 질의응답(Q&A) 챗봇입니다. 이러한 애플리케이션은 특정 소스 정보에 대한 질문에 답변할 수 있습니다. 이러한 애플리케이션들은 검색 증강 생성(Retrieval Augmented Generation) 또는 RAG로 알려진 기술을 사용합니다. 이 튜토리얼에서는 비정형 텍스트 데이터 소스를 대상으로 간단한 Q&A 애플리케이션을 구축하는 방법을 보여드립니다. 다음 내용을 다룹니다:- 간단한 도구로 검색을 실행하는 RAG 에이전트. 이는 범용적으로 사용할 수 있는 좋은 구현입니다.
- 쿼리당 단일 LLM 호출만 사용하는 2단계 RAG 체인. 이는 간단한 쿼리에 빠르고 효과적인 방법입니다.
개념
다음 개념들을 다룹니다:- 인덱싱: 소스에서 데이터를 수집하고 인덱싱하는 파이프라인. 일반적으로 별도의 프로세스에서 수행됩니다.
- 검색 및 생성: 실제 RAG 프로세스로, 런타임에 사용자 쿼리를 받아 인덱스에서 관련 데이터를 검색한 다음 모델에 전달합니다.
이 튜토리얼의 인덱싱 부분은 의미적 검색 튜토리얼을 크게 따릅니다.데이터가 이미 검색 가능한 상태(즉, 검색을 실행할 함수가 있음)이거나 해당 튜토리얼 내용에 익숙하다면, 검색 및 생성 섹션으로 건너뛰어도 좋습니다.
미리보기
이 가이드에서는 웹사이트의 콘텐츠에 대한 질문에 답하는 앱을 구축합니다. 사용할 특정 웹사이트는 Lilian Weng의 LLM Powered Autonomous Agents 블로그 포스트입니다. 이를 통해 게시물의 내용에 대한 질문을 할 수 있습니다. 약 40줄의 코드로 간단한 인덱싱 파이프라인과 RAG 체인을 만들 수 있습니다. 전체 코드 스니펫은 아래를 참조하세요:전체 코드 스니펫 펼치기
전체 코드 스니펫 펼치기
설정
설치
이 튜토리얼에는 다음 langchain 의존성이 필요합니다:LangSmith
LangChain으로 구축하는 많은 애플리케이션에는 여러 LLM 호출을 포함하는 여러 단계가 포함됩니다. 이러한 애플리케이션이 복잡해질수록 체인이나 에이전트 내부에서 정확히 무슨 일이 일어나고 있는지 검사할 수 있는 것이 매우 중요합니다. 이를 위한 최선의 방법은 LangSmith를 사용하는 것입니다. 위 링크에서 가입한 후, 추적 로깅을 시작하려면 환경 변수를 설정해야 합니다:구성 요소
LangChain의 통합 모음에서 세 가지 구성 요소를 선택해야 합니다. 채팅 모델 선택:- OpenAI
- Anthropic
- Azure
- Google Gemini
- Bedrock Converse
- OpenAI
- Azure
- AWS
- VertexAI
- MistralAI
- Cohere
- Memory
- Chroma
- FAISS
- MongoDB
- PGVector
- Pinecone
- Qdrant
1. 인덱싱
이 섹션은 의미적 검색 튜토리얼의 축약 버전입니다.데이터가 이미 인덱싱되어 검색 가능한 상태(즉, 검색을 실행할 함수가 있음)이거나 문서 로더, 임베딩, 벡터 스토어에 익숙하다면, 검색 및 생성 섹션으로 건너뛰어도 좋습니다.
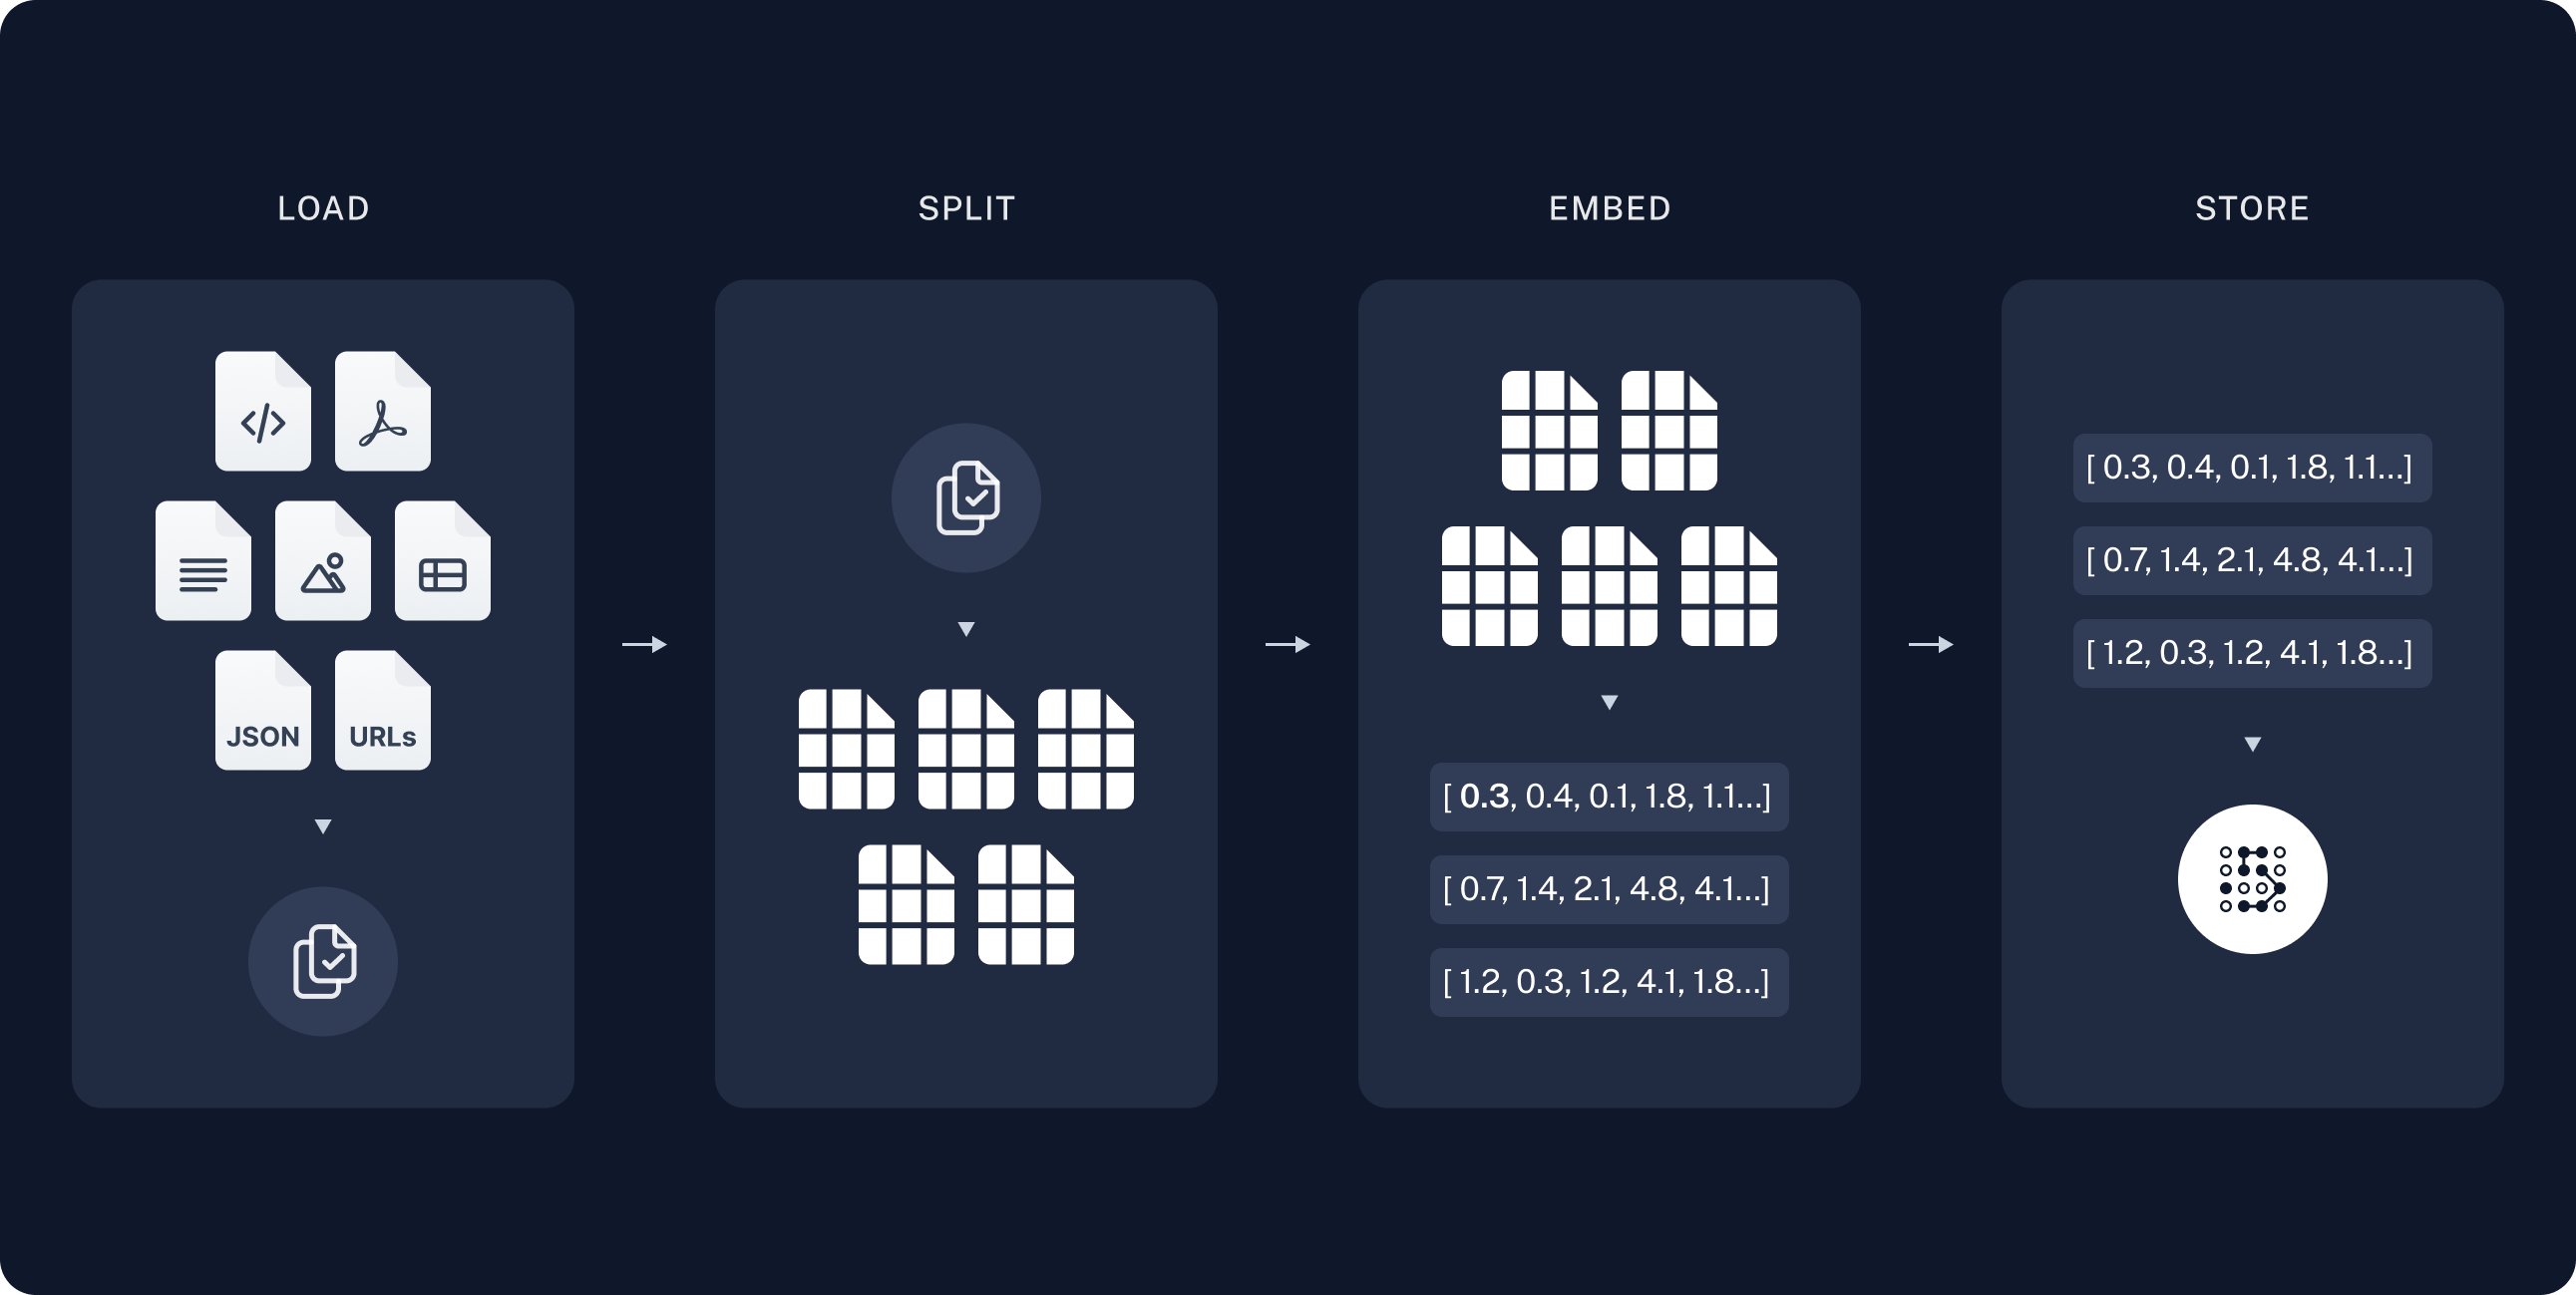
- 로드: 먼저 데이터를 로드해야 합니다. 이는 문서 로더로 수행됩니다.
- 분할: 텍스트 분할기는 대용량
Documents를 더 작은 청크로 나눕니다. 이는 데이터 인덱싱 및 모델에 전달하는 데 유용합니다. 큰 청크는 검색하기 어렵고 모델의 제한된 컨텍스트 윈도우에 맞지 않기 때문입니다. - 저장: 나중에 검색할 수 있도록 분할된 청크를 저장하고 인덱싱할 곳이 필요합니다. 이는 일반적으로 VectorStore 및 임베딩 모델을 사용하여 수행됩니다.
문서 로드하기
먼저 블로그 포스트 내용을 로드해야 합니다. 소스에서 데이터를 로드하고 Document 객체 목록을 반환하는 객체인 DocumentLoaders를 사용할 수 있습니다.DocumentLoader: 소스에서 Documents 목록으로 데이터를 로드하는 객체.
문서 분할하기
로드된 문서는 42,000자가 넘어 많은 모델의 컨텍스트 윈도우에 맞지 않습니다. 전체 포스트를 컨텍스트 윈도우에 맞출 수 있는 모델의 경우에도, 모델은 매우 긴 입력에서 정보를 찾는 데 어려움을 겪을 수 있습니다. 이를 처리하기 위해Document를 임베딩 및 벡터 저장을 위한 청크로 분할합니다. 이는 런타임에 블로그 포스트의 가장 관련성 높은 부분만 검색하는 데 도움이 됩니다.
의미적 검색 튜토리얼에서와 같이, RecursiveCharacterTextSplitter를 사용합니다. 이는 새 줄과 같은 공통 구분자를 사용하여 각 청크가 적절한 크기가 될 때까지 문서를 재귀적으로 분할합니다. 이는 일반 텍스트 사용 사례에 권장되는 텍스트 분할기입니다.
문서 저장하기
이제 런타임에 검색할 수 있도록 66개의 텍스트 청크를 인덱싱해야 합니다. 의미적 검색 튜토리얼에 따라, 각 문서 분할의 내용을 임베딩하고 이러한 임베딩을 벡터 스토어에 삽입하는 접근 방식을 사용합니다. 입력 쿼리가 주어지면 벡터 검색을 사용하여 관련 문서를 검색할 수 있습니다. 튜토리얼 시작 부분에서 선택한 벡터 스토어 및 임베딩 모델을 사용하여 단일 명령으로 모든 문서 분할을 임베딩하고 저장할 수 있습니다.Embeddings: 텍스트를 임베딩으로 변환하는 데 사용되는 텍스트 임베딩 모델의 래퍼.
VectorStore: 임베딩을 저장하고 쿼리하는 데 사용되는 벡터 데이터베이스의 래퍼.
이것으로 파이프라인의 인덱싱 부분이 완료됩니다. 이 시점에서 블로그 포스트의 청크된 콘텐츠가 포함된 쿼리 가능한 벡터 스토어가 있습니다. 사용자 질문이 주어지면 이상적으로 질문에 답하는 블로그 포스트의 스니펫을 반환할 수 있어야 합니다.
2. 검색 및 생성
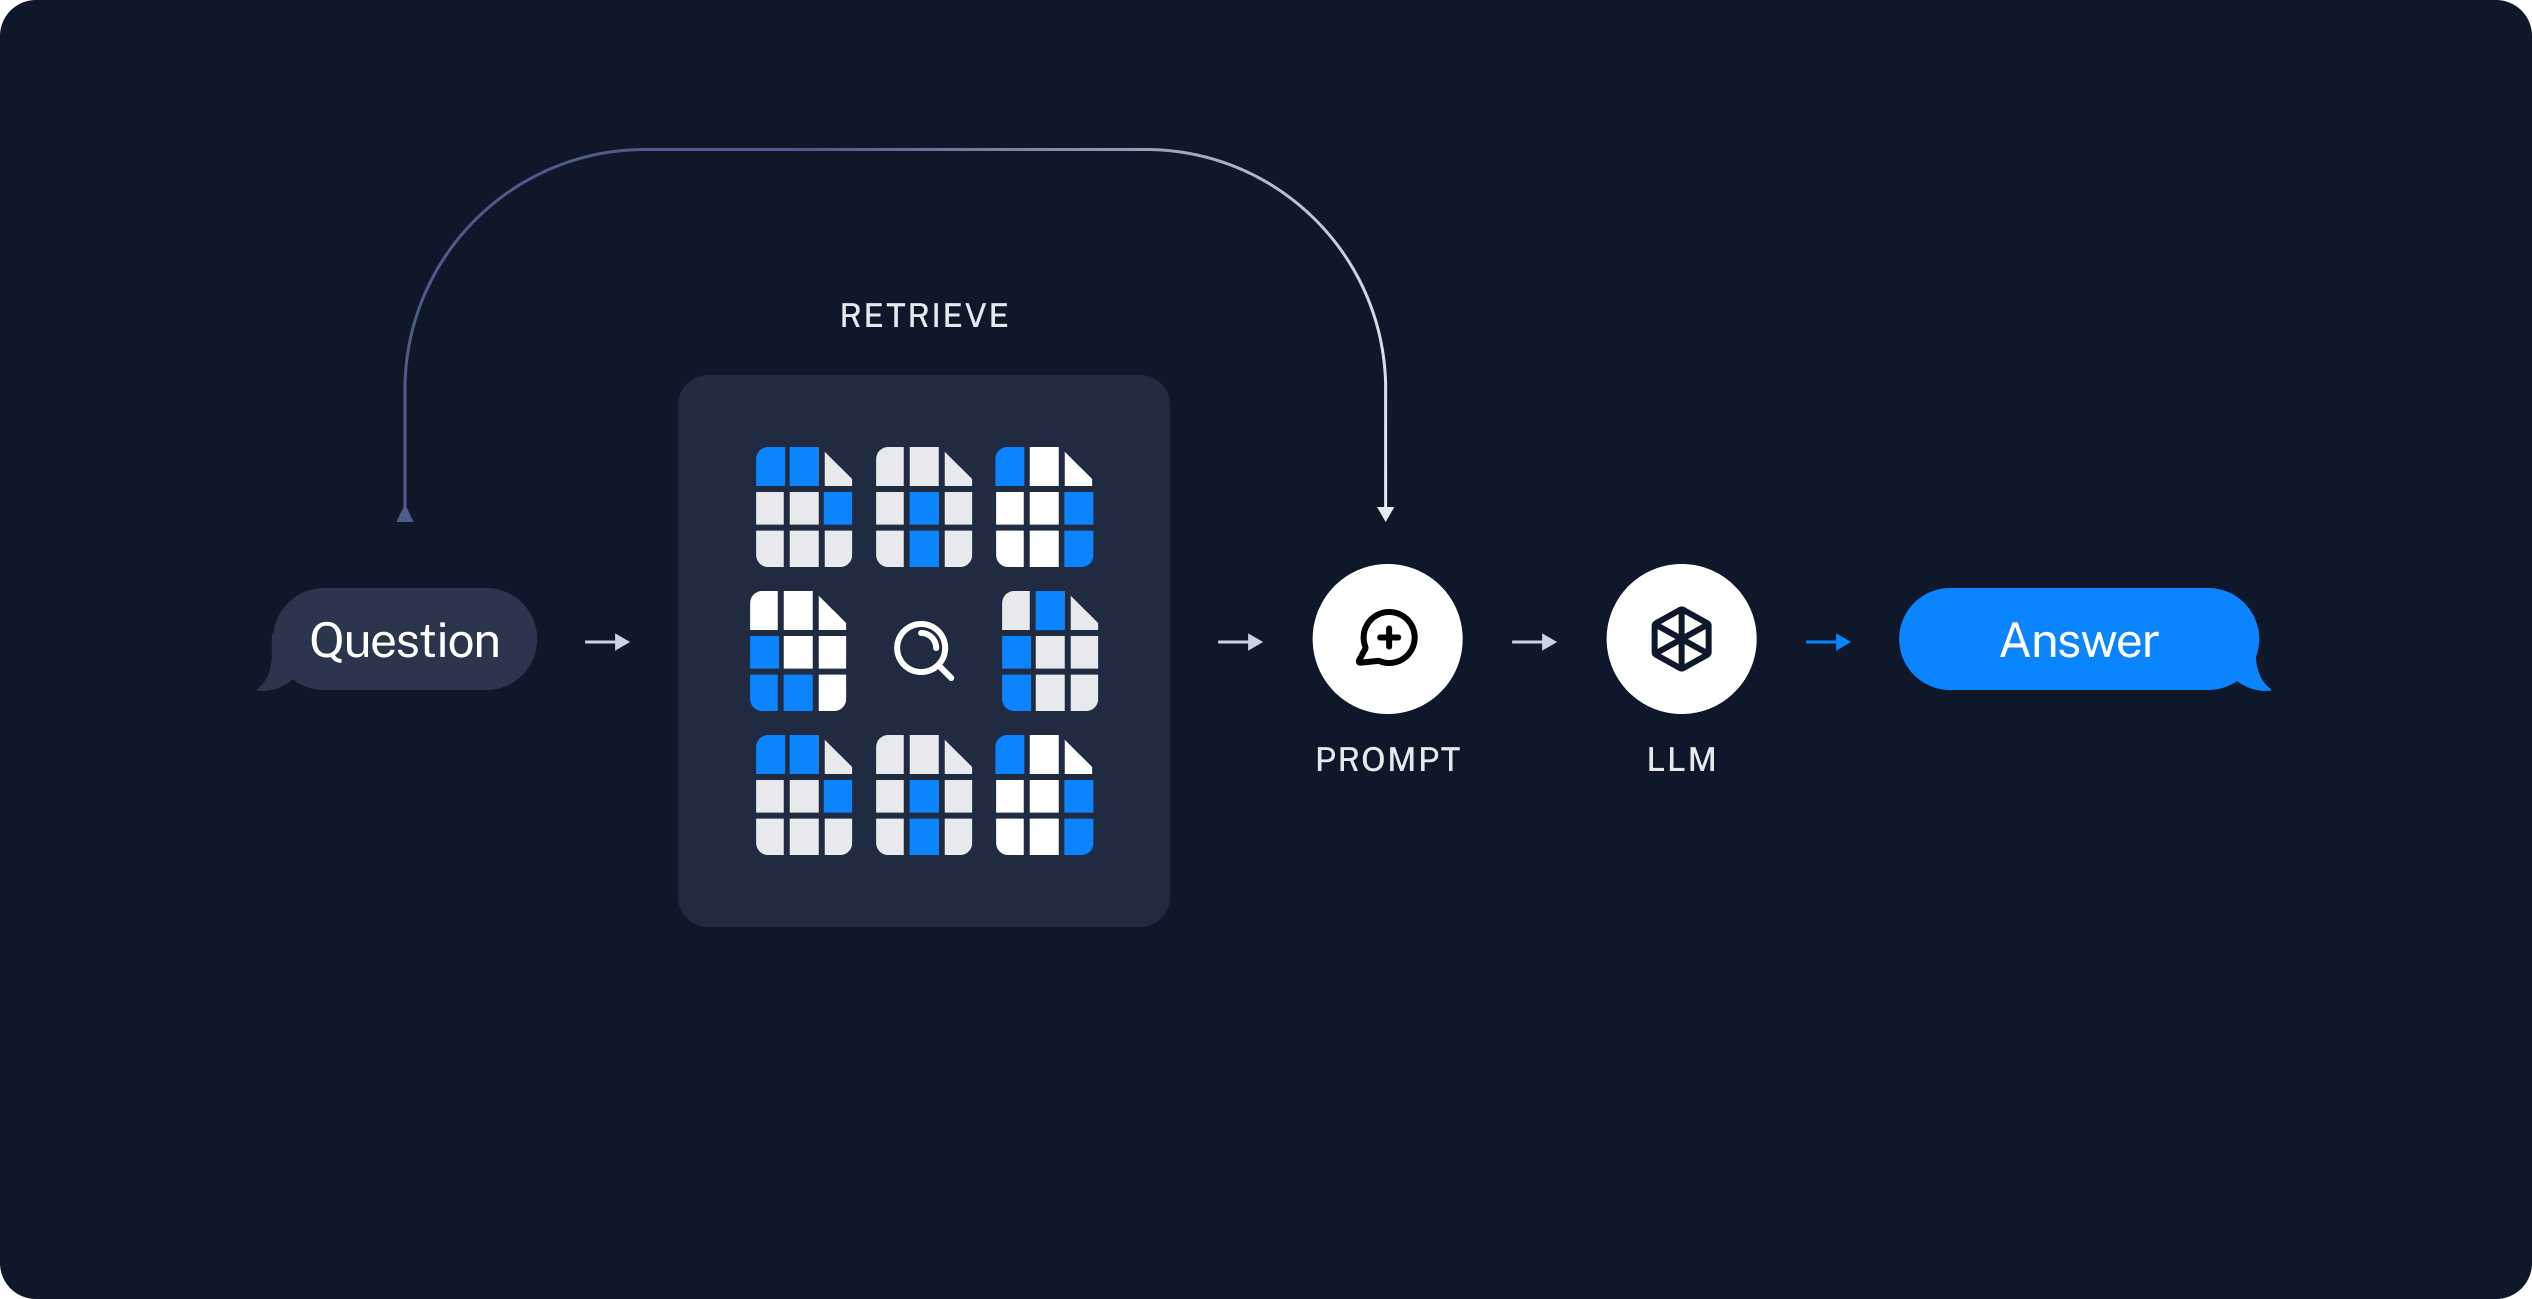
RAG 애플리케이션은 일반적으로 다음과 같이 작동합니다:- 검색: 사용자 입력이 주어지면 Retriever를 사용하여 저장소에서 관련 분할을 검색합니다.
- 생성: 모델이 검색된 데이터와 함께 질문을 포함하는 프롬프트를 사용하여 답변을 생성합니다.
- 간단한 도구로 검색을 실행하는 RAG 에이전트. 이는 범용적으로 사용할 수 있는 좋은 구현입니다.
- 쿼리당 단일 LLM 호출만 사용하는 2단계 RAG 체인. 이는 간단한 쿼리에 빠르고 효과적인 방법입니다.
RAG 에이전트
RAG 애플리케이션의 한 가지 형식은 정보를 검색하는 도구를 가진 간단한 에이전트입니다. 벡터 스토어를 래핑하는 도구를 구현하여 최소한의 RAG 에이전트를 조립할 수 있습니다:- 작업 분해의 표준 방법을 검색하기 위한 쿼리를 생성합니다.
- 답변을 받은 후, 그 방법의 일반적인 확장을 검색하기 위한 두 번째 쿼리를 생성합니다.
- 필요한 모든 컨텍스트를 받은 후 질문에 답변합니다.
RAG 체인
위의 에이전틱 RAG 형식에서는 LLM이 사용자 쿼리에 답변하는 데 도움이 되도록 도구 호출을 생성하는 재량권을 허용합니다. 이는 범용적으로 사용할 수 있는 좋은 솔루션이지만 몇 가지 트레이드오프가 있습니다:| ✅ 장점 | ⚠️ 단점 |
|---|---|
| 필요할 때만 검색 – LLM은 불필요한 검색을 트리거하지 않고 인사말, 후속 질문 및 간단한 쿼리를 처리할 수 있습니다. | 두 번의 추론 호출 – 검색이 수행되면 쿼리를 생성하는 호출과 최종 응답을 생성하는 호출이 필요합니다. |
컨텍스트 기반 검색 쿼리 – 검색을 query 입력이 있는 도구로 처리함으로써 LLM은 대화 컨텍스트를 통합하는 자체 쿼리를 작성합니다. | 제어 감소 – LLM은 실제로 필요할 때 검색을 건너뛰거나 불필요할 때 추가 검색을 실행할 수 있습니다. |
| 여러 검색 허용 – LLM은 단일 사용자 쿼리를 지원하기 위해 여러 검색을 실행할 수 있습니다. |
소스 문서 반환하기
소스 문서 반환하기
위의 RAG 체인은 검색된 컨텍스트를 해당 실행의 단일 시스템 메시지에 통합합니다.에이전틱 RAG 형식에서처럼, 때때로 문서 메타데이터에 액세스하기 위해 애플리케이션 상태에 원시 소스 문서를 포함하고 싶을 수 있습니다. 2단계 체인 사례에서 다음을 수행하여 이를 수행할 수 있습니다:
- 검색된 문서를 저장할 키를 상태에 추가
- pre-model 훅을 통해 새 노드를 추가하여 해당 키를 채웁니다(그리고 컨텍스트를 주입합니다).
다음 단계
이제 @[create_agent]를 통해 간단한 RAG 애플리케이션을 구현했으므로 새로운 기능을 쉽게 통합하고 더 깊이 들어갈 수 있습니다:
- 응답성 있는 사용자 경험을 위해 토큰 및 기타 정보를 스트리밍
- 다중 턴 상호 작용을 지원하기 위해 대화 메모리 추가
- 대화 스레드 간 메모리를 지원하기 위해 장기 메모리 추가
- 구조화된 응답 추가
- LangSmith Deployments로 애플리케이션 배포