

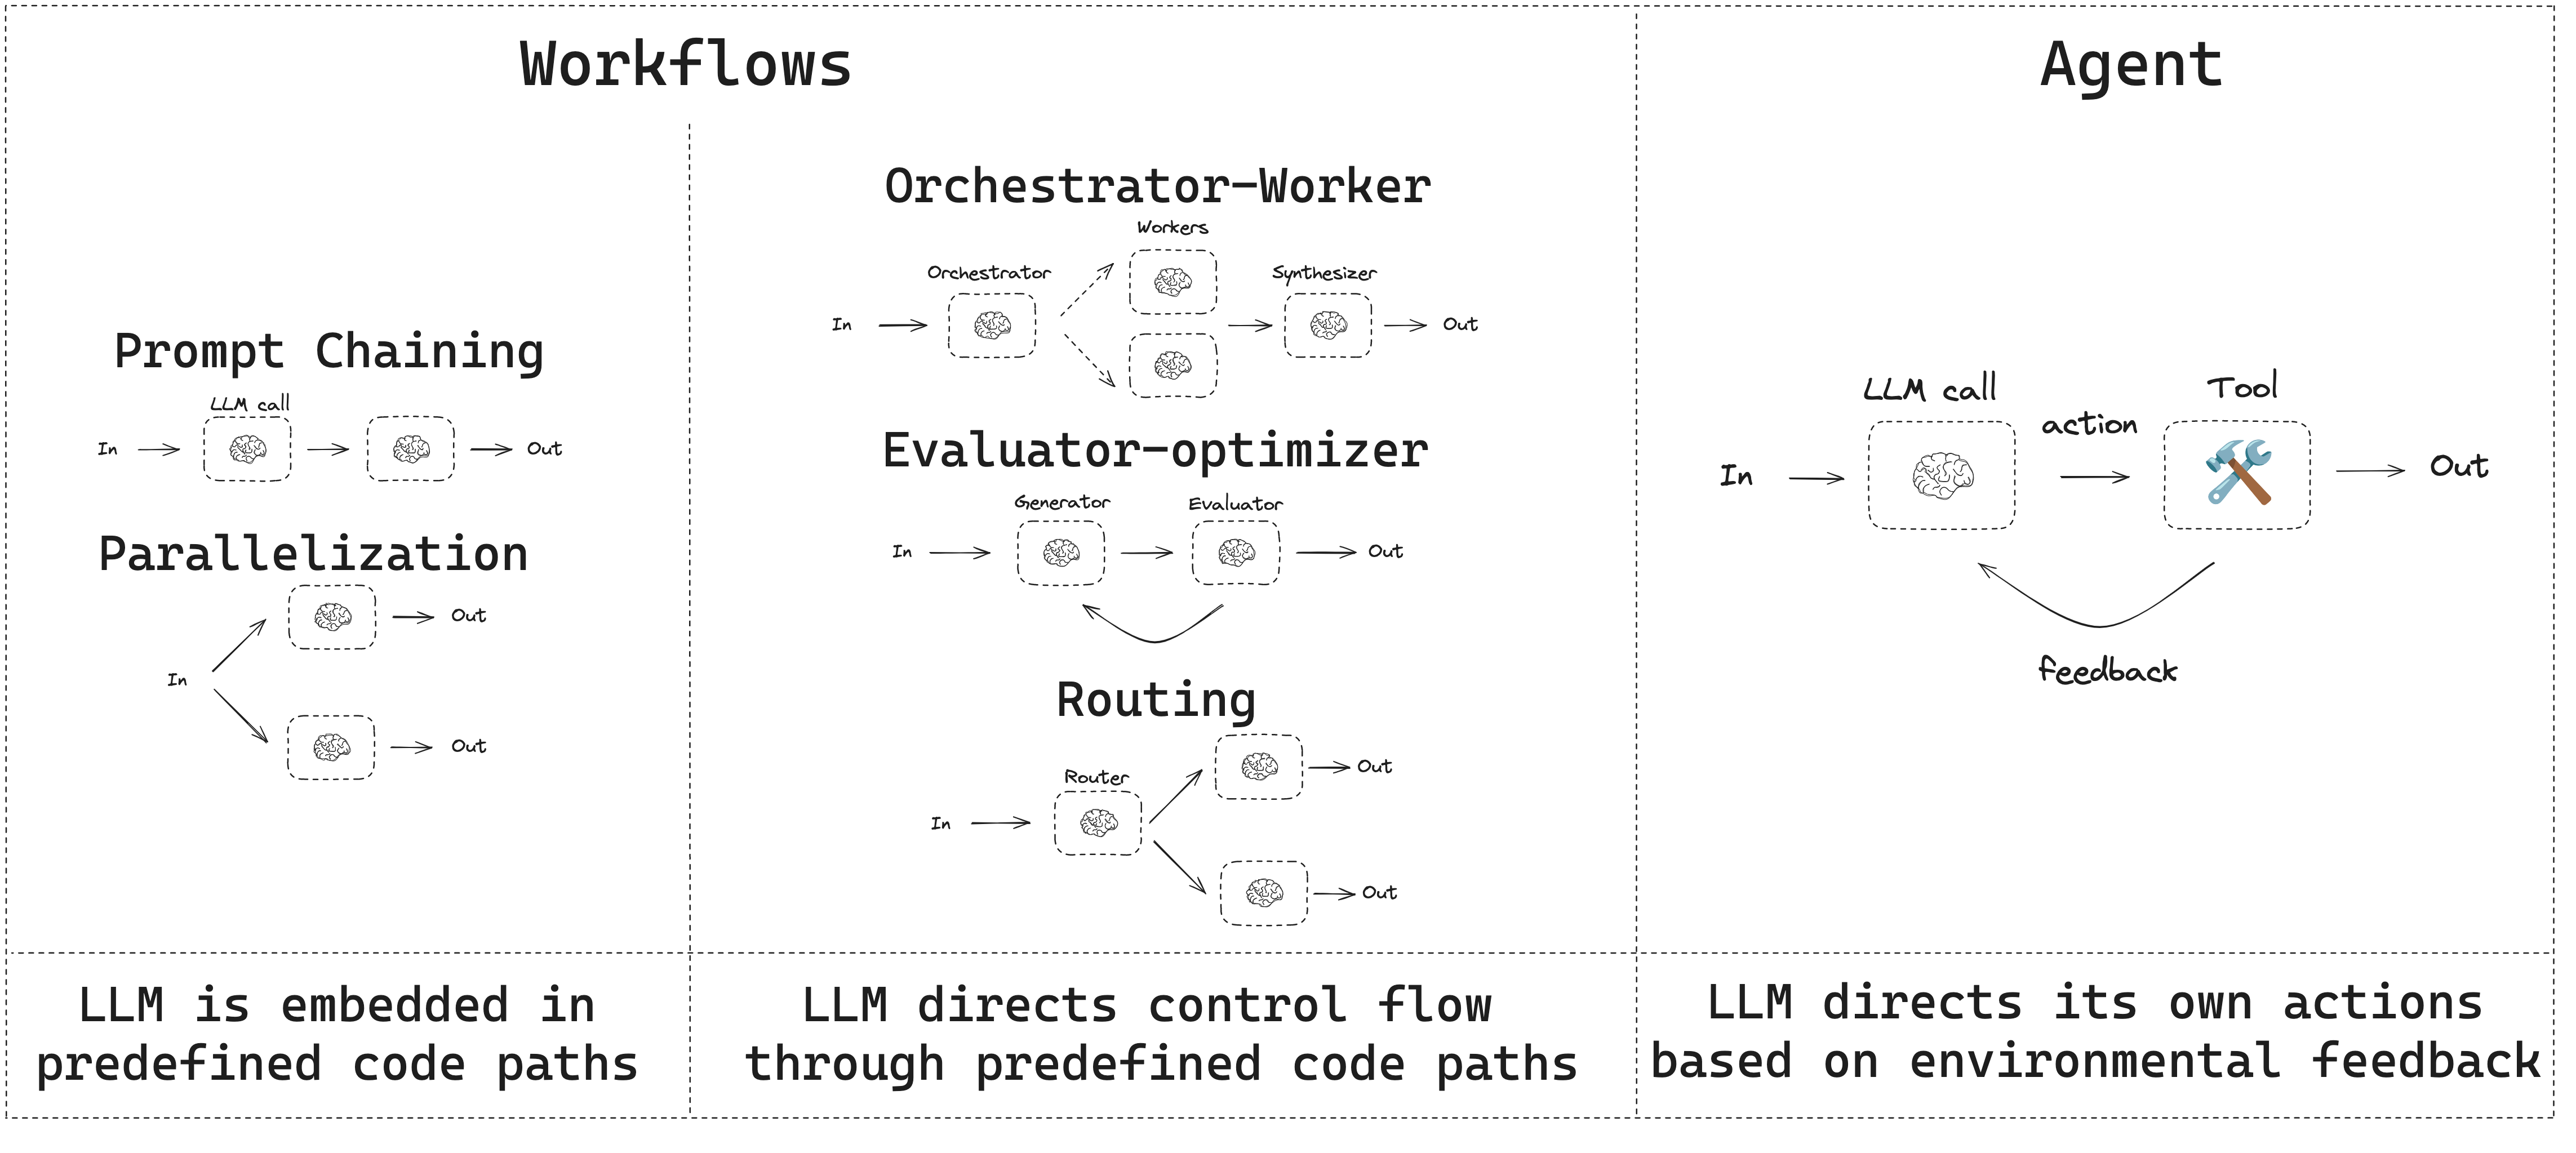
- 워크플로우는 미리 정해진 코드 경로를 가지며 특정 순서대로 동작하도록 설계됩니다.
- 에이전트는 동적이며 자체적으로 프로세스와 도구 사용을 정의합니다.
설정
워크플로우나 에이전트를 구축하려면 구조화된 출력과 도구 호출을 지원하는 모든 채팅 모델을 사용할 수 있습니다. 다음 예제는 Anthropic을 사용합니다:- 종속성 설치:
Copy
pip install langchain_core langchain-anthropic langgraph
- LLM 초기화:
Copy
import os
import getpass

from langchain_anthropic import ChatAnthropic

def _set_env(var: str):
    if not os.environ.get(var):
        os.environ[var] = getpass.getpass(f"{var}: ")


_set_env("ANTHROPIC_API_KEY")

llm = ChatAnthropic(model="claude-sonnet-4-5")
LLM과 확장 기능
워크플로우와 에이전트 시스템은 LLM과 여기에 추가하는 다양한 확장 기능을 기반으로 합니다. 도구 호출, 구조화된 출력, 단기 메모리는 필요에 맞게 LLM을 조정하기 위한 몇 가지 옵션입니다.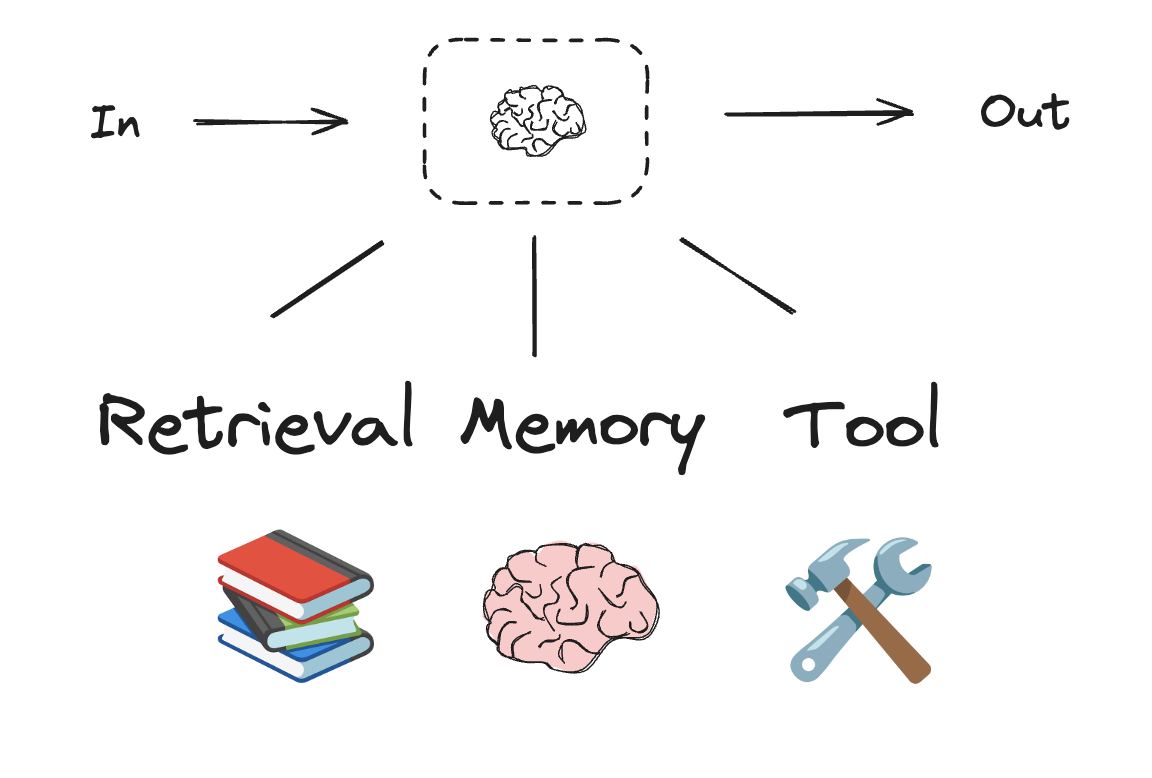
Copy
# 구조화된 출력을 위한 스키마
from pydantic import BaseModel, Field


class SearchQuery(BaseModel):
    search_query: str = Field(None, description="Query that is optimized web search.")
    justification: str = Field(
        None, description="Why this query is relevant to the user's request."
    )


# 구조화된 출력을 위한 스키마로 LLM 확장
structured_llm = llm.with_structured_output(SearchQuery)

# 확장된 LLM 호출
output = structured_llm.invoke("How does Calcium CT score relate to high cholesterol?")

# 도구 정의
def multiply(a: int, b: int) -> int:
    return a * b

# 도구로 LLM 확장
llm_with_tools = llm.bind_tools([multiply])

# 도구 호출을 트리거하는 입력으로 LLM 호출
msg = llm_with_tools.invoke("What is 2 times 3?")

# 도구 호출 가져오기
msg.tool_calls
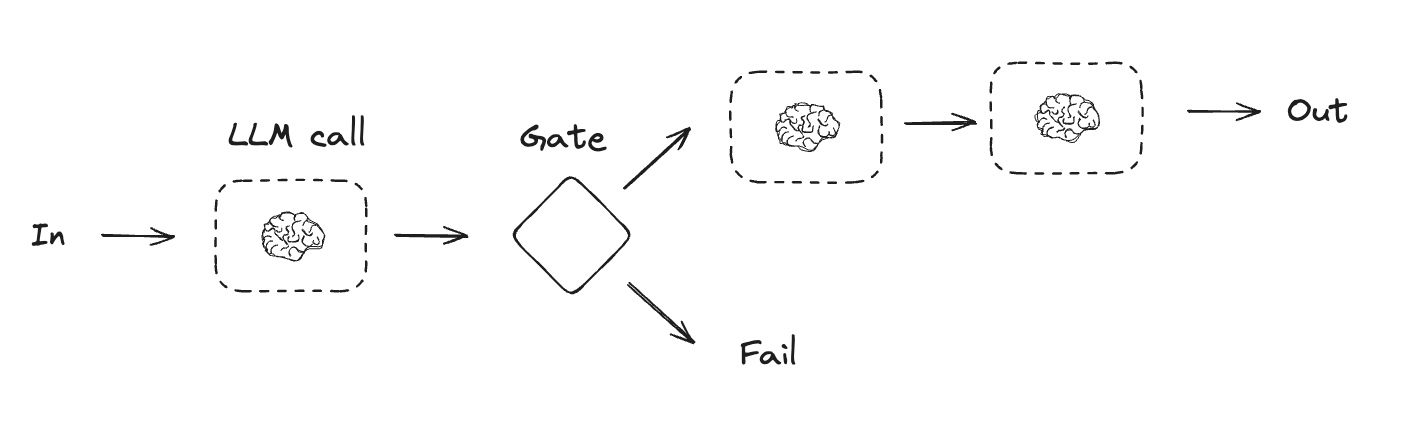
프롬프트 체이닝
프롬프트 체이닝은 각 LLM 호출이 이전 호출의 출력을 처리하는 방식입니다. 이는 잘 정의된 작업을 더 작고 검증 가능한 단계로 나누어 수행할 때 자주 사용됩니다. 몇 가지 예시는 다음과 같습니다:- 문서를 다른 언어로 번역하기
- 생성된 콘텐츠의 일관성 검증하기
Copy
from typing_extensions import TypedDict
from langgraph.graph import StateGraph, START, END
from IPython.display import Image, display


# 그래프 상태
class State(TypedDict):
    topic: str
    joke: str
    improved_joke: str
    final_joke: str


# 노드
def generate_joke(state: State):
    """초기 농담을 생성하는 첫 번째 LLM 호출"""

    msg = llm.invoke(f"Write a short joke about {state['topic']}")
    return {"joke": msg.content}


def check_punchline(state: State):
    """농담에 펀치라인이 있는지 확인하는 게이트 함수"""

    # 간단한 확인 - 농담에 "?"나 "!"가 포함되어 있는가?
    if "?" in state["joke"] or "!" in state["joke"]:
        return "Pass"
    return "Fail"


def improve_joke(state: State):
    """농담을 개선하는 두 번째 LLM 호출"""

    msg = llm.invoke(f"Make this joke funnier by adding wordplay: {state['joke']}")
    return {"improved_joke": msg.content}


def polish_joke(state: State):
    """최종 다듬기를 위한 세 번째 LLM 호출"""
    msg = llm.invoke(f"Add a surprising twist to this joke: {state['improved_joke']}")
    return {"final_joke": msg.content}


# 워크플로우 구축
workflow = StateGraph(State)

# 노드 추가
workflow.add_node("generate_joke", generate_joke)
workflow.add_node("improve_joke", improve_joke)
workflow.add_node("polish_joke", polish_joke)

# 노드를 연결하는 엣지 추가
workflow.add_edge(START, "generate_joke")
workflow.add_conditional_edges(
    "generate_joke", check_punchline, {"Fail": "improve_joke", "Pass": END}
)
workflow.add_edge("improve_joke", "polish_joke")
workflow.add_edge("polish_joke", END)

# 컴파일
chain = workflow.compile()

# 워크플로우 표시
display(Image(chain.get_graph().draw_mermaid_png()))

# 실행
state = chain.invoke({"topic": "cats"})
print("Initial joke:")
print(state["joke"])
print("\n--- --- ---\n")
if "improved_joke" in state:
    print("Improved joke:")
    print(state["improved_joke"])
    print("\n--- --- ---\n")

    print("Final joke:")
    print(state["final_joke"])
else:
    print("Joke failed quality gate - no punchline detected!")
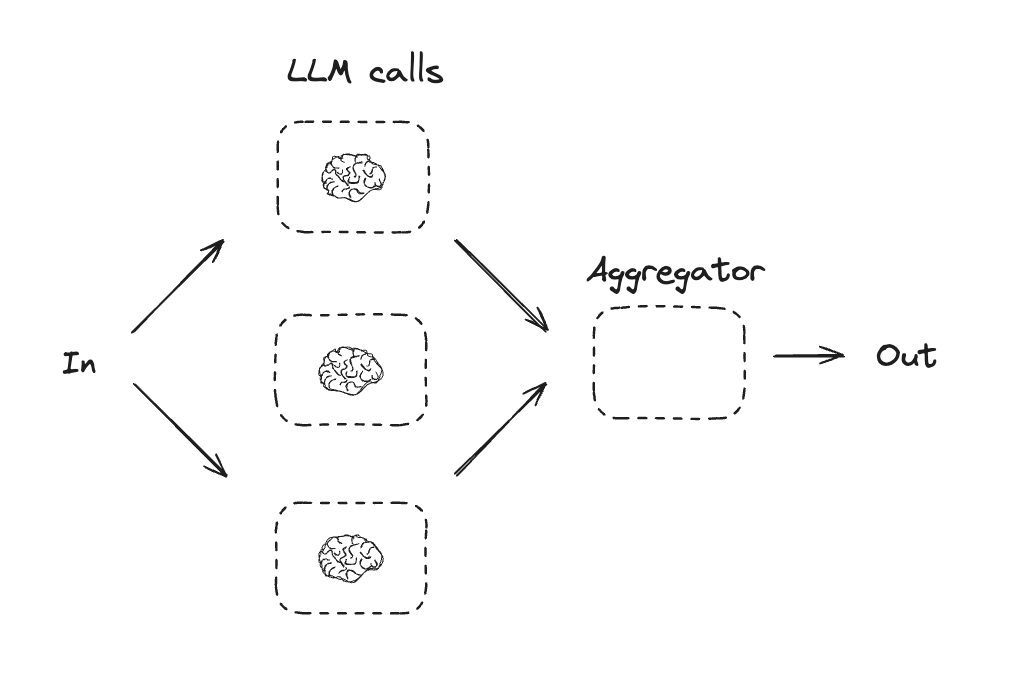
병렬화
병렬화는 LLM들이 작업에 대해 동시에 작업하는 방식입니다. 이는 여러 독립적인 하위 작업을 동시에 실행하거나, 다른 출력을 확인하기 위해 동일한 작업을 여러 번 실행하는 방식으로 수행됩니다. 병렬화는 일반적으로 다음과 같은 경우에 사용됩니다:- 하위 작업을 분할하여 병렬로 실행하여 속도를 높임
- 다른 출력을 확인하기 위해 작업을 여러 번 실행하여 신뢰도를 높임
- 문서에서 키워드를 처리하는 하나의 하위 작업과 서식 오류를 확인하는 두 번째 하위 작업을 동시에 실행
- 인용 횟수, 사용된 소스 수, 소스의 품질과 같이 다른 기준에 따라 문서의 정확성을 평가하는 작업을 여러 번 실행
Copy
# 그래프 상태
class State(TypedDict):
    topic: str
    joke: str
    story: str
    poem: str
    combined_output: str


# 노드
def call_llm_1(state: State):
    """초기 농담을 생성하는 첫 번째 LLM 호출"""

    msg = llm.invoke(f"Write a joke about {state['topic']}")
    return {"joke": msg.content}


def call_llm_2(state: State):
    """이야기를 생성하는 두 번째 LLM 호출"""

    msg = llm.invoke(f"Write a story about {state['topic']}")
    return {"story": msg.content}


def call_llm_3(state: State):
    """시를 생성하는 세 번째 LLM 호출"""

    msg = llm.invoke(f"Write a poem about {state['topic']}")
    return {"poem": msg.content}


def aggregator(state: State):
    """농담과 이야기를 단일 출력으로 결합"""

    combined = f"Here's a story, joke, and poem about {state['topic']}!\n\n"
    combined += f"STORY:\n{state['story']}\n\n"
    combined += f"JOKE:\n{state['joke']}\n\n"
    combined += f"POEM:\n{state['poem']}"
    return {"combined_output": combined}


# 워크플로우 구축
parallel_builder = StateGraph(State)

# 노드 추가
parallel_builder.add_node("call_llm_1", call_llm_1)
parallel_builder.add_node("call_llm_2", call_llm_2)
parallel_builder.add_node("call_llm_3", call_llm_3)
parallel_builder.add_node("aggregator", aggregator)

# 노드를 연결하는 엣지 추가
parallel_builder.add_edge(START, "call_llm_1")
parallel_builder.add_edge(START, "call_llm_2")
parallel_builder.add_edge(START, "call_llm_3")
parallel_builder.add_edge("call_llm_1", "aggregator")
parallel_builder.add_edge("call_llm_2", "aggregator")
parallel_builder.add_edge("call_llm_3", "aggregator")
parallel_builder.add_edge("aggregator", END)
parallel_workflow = parallel_builder.compile()

# 워크플로우 표시
display(Image(parallel_workflow.get_graph().draw_mermaid_png()))

# 실행
state = parallel_workflow.invoke({"topic": "cats"})
print(state["combined_output"])
라우팅
라우팅 워크플로우는 입력을 처리한 다음 컨텍스트별 작업으로 지시합니다. 이를 통해 복잡한 작업에 대한 전문화된 플로우를 정의할 수 있습니다. 예를 들어, 제품 관련 질문에 답변하기 위해 구축된 워크플로우는 먼저 질문 유형을 처리한 다음 가격, 환불, 반품 등에 대한 특정 프로세스로 요청을 라우팅할 수 있습니다.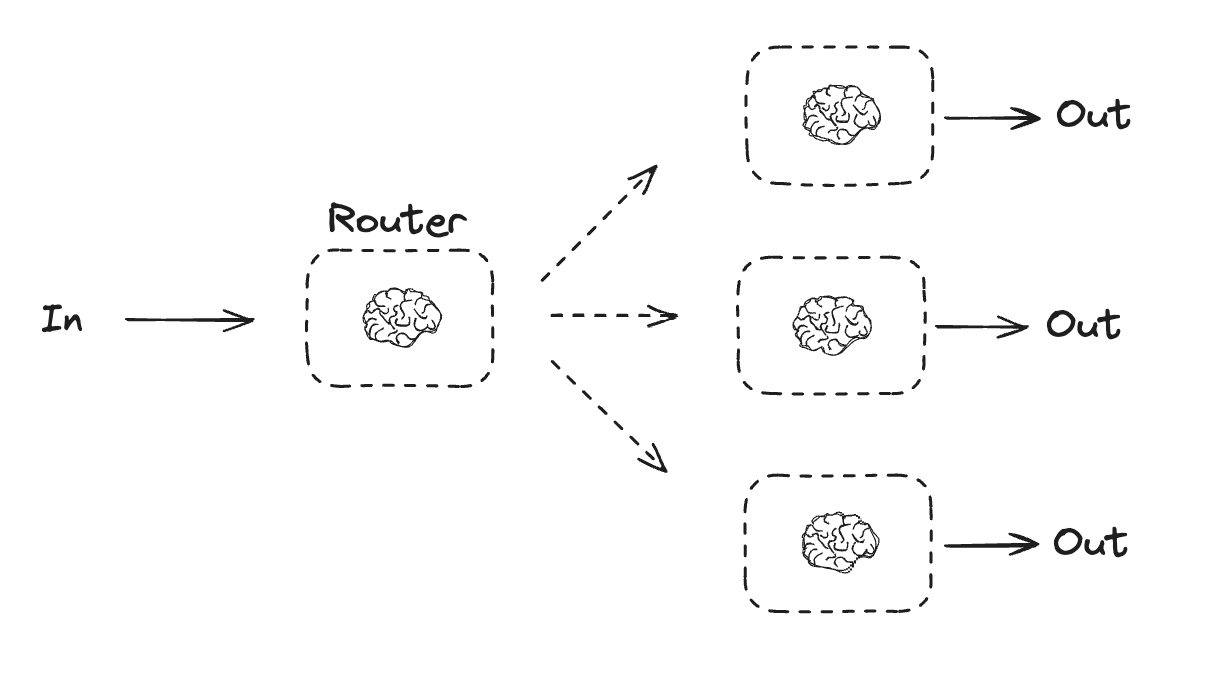
Copy
from typing_extensions import Literal
from langchain.messages import HumanMessage, SystemMessage


# 라우팅 로직으로 사용할 구조화된 출력을 위한 스키마
class Route(BaseModel):
    step: Literal["poem", "story", "joke"] = Field(
        None, description="The next step in the routing process"
    )


# 구조화된 출력을 위한 스키마로 LLM 확장
router = llm.with_structured_output(Route)


# 상태
class State(TypedDict):
    input: str
    decision: str
    output: str


# 노드
def llm_call_1(state: State):
    """이야기 작성"""

    result = llm.invoke(state["input"])
    return {"output": result.content}


def llm_call_2(state: State):
    """농담 작성"""

    result = llm.invoke(state["input"])
    return {"output": result.content}


def llm_call_3(state: State):
    """시 작성"""

    result = llm.invoke(state["input"])
    return {"output": result.content}


def llm_call_router(state: State):
    """입력을 적절한 노드로 라우팅"""

    # 라우팅 로직으로 사용할 구조화된 출력이 포함된 확장 LLM 실행
    decision = router.invoke(
        [
            SystemMessage(
                content="Route the input to story, joke, or poem based on the user's request."
            ),
            HumanMessage(content=state["input"]),
        ]
    )

    return {"decision": decision.step}


# 적절한 노드로 라우팅하는 조건부 엣지 함수
def route_decision(state: State):
    # 다음으로 방문할 노드 이름 반환
    if state["decision"] == "story":
        return "llm_call_1"
    elif state["decision"] == "joke":
        return "llm_call_2"
    elif state["decision"] == "poem":
        return "llm_call_3"


# 워크플로우 구축
router_builder = StateGraph(State)

# 노드 추가
router_builder.add_node("llm_call_1", llm_call_1)
router_builder.add_node("llm_call_2", llm_call_2)
router_builder.add_node("llm_call_3", llm_call_3)
router_builder.add_node("llm_call_router", llm_call_router)

# 노드를 연결하는 엣지 추가
router_builder.add_edge(START, "llm_call_router")
router_builder.add_conditional_edges(
    "llm_call_router",
    route_decision,
    {  # route_decision에서 반환된 이름 : 다음으로 방문할 노드 이름
        "llm_call_1": "llm_call_1",
        "llm_call_2": "llm_call_2",
        "llm_call_3": "llm_call_3",
    },
)
router_builder.add_edge("llm_call_1", END)
router_builder.add_edge("llm_call_2", END)
router_builder.add_edge("llm_call_3", END)

# 워크플로우 컴파일
router_workflow = router_builder.compile()

# 워크플로우 표시
display(Image(router_workflow.get_graph().draw_mermaid_png()))

# 실행
state = router_workflow.invoke({"input": "Write me a joke about cats"})
print(state["output"])
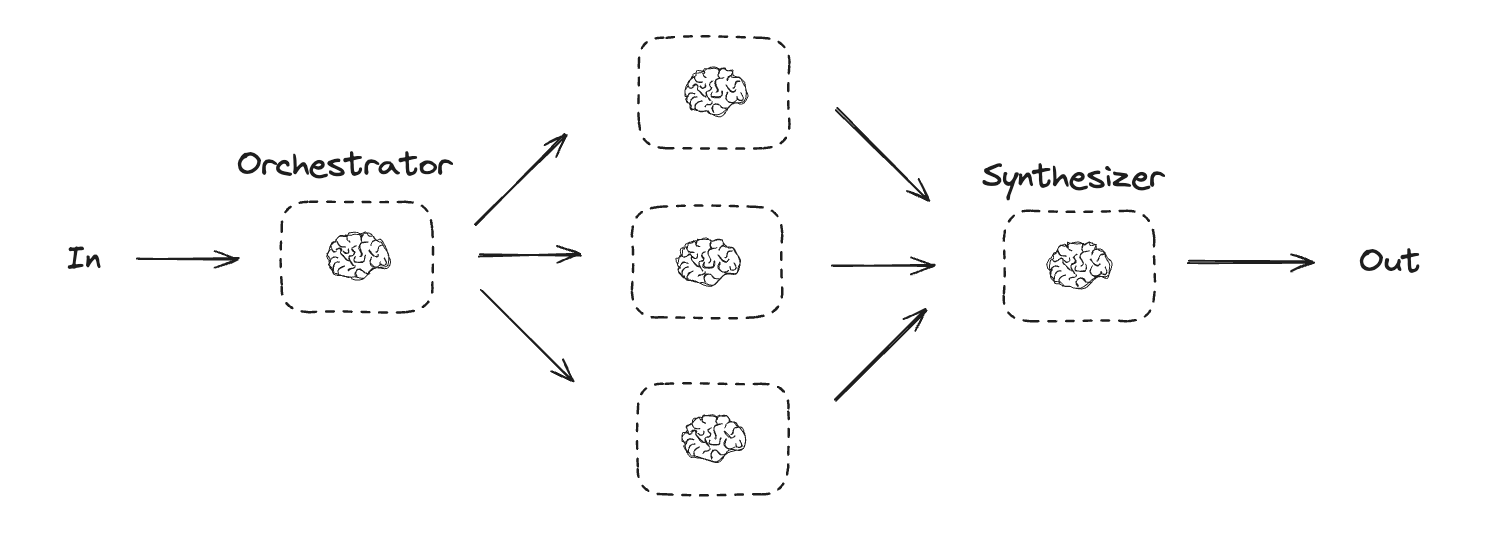
오케스트레이터-워커
오케스트레이터-워커 구성에서 오케스트레이터는 다음을 수행합니다:- 작업을 하위 작업으로 분해
- 하위 작업을 워커에 위임
- 워커 출력을 최종 결과로 합성
Copy
from typing import Annotated, List
import operator


# 계획에 사용할 구조화된 출력을 위한 스키마
class Section(BaseModel):
    name: str = Field(
        description="Name for this section of the report.",
    )
    description: str = Field(
        description="Brief overview of the main topics and concepts to be covered in this section.",
    )


class Sections(BaseModel):
    sections: List[Section] = Field(
        description="Sections of the report.",
    )


# 구조화된 출력을 위한 스키마로 LLM 확장
planner = llm.with_structured_output(Sections)
LangGraph에서 워커 생성하기
오케스트레이터-워커 워크플로우는 일반적이며 LangGraph는 이에 대한 내장 지원을 제공합니다.Send API를 사용하면 워커 노드를 동적으로 생성하고 특정 입력을 보낼 수 있습니다. 각 워커는 자체 상태를 가지며, 모든 워커 출력은 오케스트레이터 그래프에서 액세스할 수 있는 공유 상태 키에 기록됩니다. 이를 통해 오케스트레이터는 모든 워커 출력에 액세스하고 이를 최종 출력으로 합성할 수 있습니다. 아래 예제는 섹션 목록을 반복하고 Send API를 사용하여 각 워커에 섹션을 보냅니다.
Copy
from langgraph.types import Send


# 그래프 상태
class State(TypedDict):
    topic: str  # 보고서 주제
    sections: list[Section]  # 보고서 섹션 목록
    completed_sections: Annotated[
        list, operator.add
    ]  # 모든 워커가 병렬로 이 키에 작성
    final_report: str  # 최종 보고서


# 워커 상태
class WorkerState(TypedDict):
    section: Section
    completed_sections: Annotated[list, operator.add]


# 노드
def orchestrator(state: State):
    """보고서 계획을 생성하는 오케스트레이터"""

    # 쿼리 생성
    report_sections = planner.invoke(
        [
            SystemMessage(content="Generate a plan for the report."),
            HumanMessage(content=f"Here is the report topic: {state['topic']}"),
        ]
    )

    return {"sections": report_sections.sections}


def llm_call(state: WorkerState):
    """보고서의 섹션을 작성하는 워커"""

    # 섹션 생성
    section = llm.invoke(
        [
            SystemMessage(
                content="Write a report section following the provided name and description. Include no preamble for each section. Use markdown formatting."
            ),
            HumanMessage(
                content=f"Here is the section name: {state['section'].name} and description: {state['section'].description}"
            ),
        ]
    )

    # 업데이트된 섹션을 완료된 섹션에 작성
    return {"completed_sections": [section.content]}


def synthesizer(state: State):
    """섹션에서 전체 보고서 합성"""

    # 완료된 섹션 목록
    completed_sections = state["completed_sections"]

    # 최종 섹션의 컨텍스트로 사용할 문자열로 완료된 섹션 형식 지정
    completed_report_sections = "\n\n---\n\n".join(completed_sections)

    return {"final_report": completed_report_sections}


# 보고서의 각 섹션을 작성하는 llm_call 워커를 생성하는 조건부 엣지 함수
def assign_workers(state: State):
    """계획의 각 섹션에 워커 할당"""

    # Send() API를 통해 병렬로 섹션 작성 시작
    return [Send("llm_call", {"section": s}) for s in state["sections"]]


# 워크플로우 구축
orchestrator_worker_builder = StateGraph(State)

# 노드 추가
orchestrator_worker_builder.add_node("orchestrator", orchestrator)
orchestrator_worker_builder.add_node("llm_call", llm_call)
orchestrator_worker_builder.add_node("synthesizer", synthesizer)

# 노드를 연결하는 엣지 추가
orchestrator_worker_builder.add_edge(START, "orchestrator")
orchestrator_worker_builder.add_conditional_edges(
    "orchestrator", assign_workers, ["llm_call"]
)
orchestrator_worker_builder.add_edge("llm_call", "synthesizer")
orchestrator_worker_builder.add_edge("synthesizer", END)

# 워크플로우 컴파일
orchestrator_worker = orchestrator_worker_builder.compile()

# 워크플로우 표시
display(Image(orchestrator_worker.get_graph().draw_mermaid_png()))

# 실행
state = orchestrator_worker.invoke({"topic": "Create a report on LLM scaling laws"})

from IPython.display import Markdown
Markdown(state["final_report"])
평가자-최적화기
평가자-최적화기 워크플로우에서 하나의 LLM 호출이 응답을 생성하고 다른 하나가 해당 응답을 평가합니다. 평가자나 휴먼-인-더-루프가 응답이 개선이 필요하다고 판단하면 피드백이 제공되고 응답이 재생성됩니다. 이 루프는 허용 가능한 응답이 생성될 때까지 계속됩니다. 평가자-최적화기 워크플로우는 작업에 대한 특정 성공 기준이 있지만 해당 기준을 충족하기 위해 반복이 필요한 경우에 일반적으로 사용됩니다. 예를 들어, 두 언어 간에 텍스트를 번역할 때 항상 완벽한 일치가 있는 것은 아닙니다. 두 언어에서 같은 의미를 가진 번역을 생성하는 데 몇 번의 반복이 필요할 수 있습니다.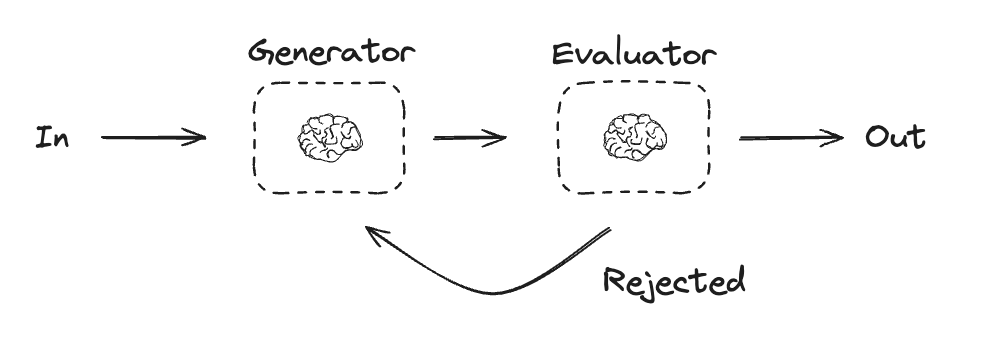
Copy
# 그래프 상태
class State(TypedDict):
    joke: str
    topic: str
    feedback: str
    funny_or_not: str


# 평가에 사용할 구조화된 출력을 위한 스키마
class Feedback(BaseModel):
    grade: Literal["funny", "not funny"] = Field(
        description="Decide if the joke is funny or not.",
    )
    feedback: str = Field(
        description="If the joke is not funny, provide feedback on how to improve it.",
    )


# 구조화된 출력을 위한 스키마로 LLM 확장
evaluator = llm.with_structured_output(Feedback)


# 노드
def llm_call_generator(state: State):
    """LLM이 농담을 생성"""

    if state.get("feedback"):
        msg = llm.invoke(
            f"Write a joke about {state['topic']} but take into account the feedback: {state['feedback']}"
        )
    else:
        msg = llm.invoke(f"Write a joke about {state['topic']}")
    return {"joke": msg.content}


def llm_call_evaluator(state: State):
    """LLM이 농담을 평가"""

    grade = evaluator.invoke(f"Grade the joke {state['joke']}")
    return {"funny_or_not": grade.grade, "feedback": grade.feedback}


# 평가자의 피드백에 따라 농담 생성기로 되돌아가거나 종료하는 조건부 엣지 함수
def route_joke(state: State):
    """평가자의 피드백에 따라 농담 생성기로 되돌아가거나 종료"""

    if state["funny_or_not"] == "funny":
        return "Accepted"
    elif state["funny_or_not"] == "not funny":
        return "Rejected + Feedback"


# 워크플로우 구축
optimizer_builder = StateGraph(State)

# 노드 추가
optimizer_builder.add_node("llm_call_generator", llm_call_generator)
optimizer_builder.add_node("llm_call_evaluator", llm_call_evaluator)

# 노드를 연결하는 엣지 추가
optimizer_builder.add_edge(START, "llm_call_generator")
optimizer_builder.add_edge("llm_call_generator", "llm_call_evaluator")
optimizer_builder.add_conditional_edges(
    "llm_call_evaluator",
    route_joke,
    {  # route_joke에서 반환된 이름 : 다음으로 방문할 노드 이름
        "Accepted": END,
        "Rejected + Feedback": "llm_call_generator",
    },
)

# 워크플로우 컴파일
optimizer_workflow = optimizer_builder.compile()

# 워크플로우 표시
display(Image(optimizer_workflow.get_graph().draw_mermaid_png()))

# 실행
state = optimizer_workflow.invoke({"topic": "Cats"})
print(state["joke"])
에이전트
에이전트는 일반적으로 도구를 사용하여 작업을 수행하는 LLM으로 구현됩니다. 이들은 지속적인 피드백 루프로 작동하며, 문제와 솔루션을 예측할 수 없는 상황에서 사용됩니다. 에이전트는 워크플로우보다 더 많은 자율성을 가지며, 사용하는 도구와 문제를 해결하는 방법에 대한 결정을 내릴 수 있습니다. 사용 가능한 도구 세트와 에이전트의 동작 방식에 대한 가이드라인을 여전히 정의할 수 있습니다.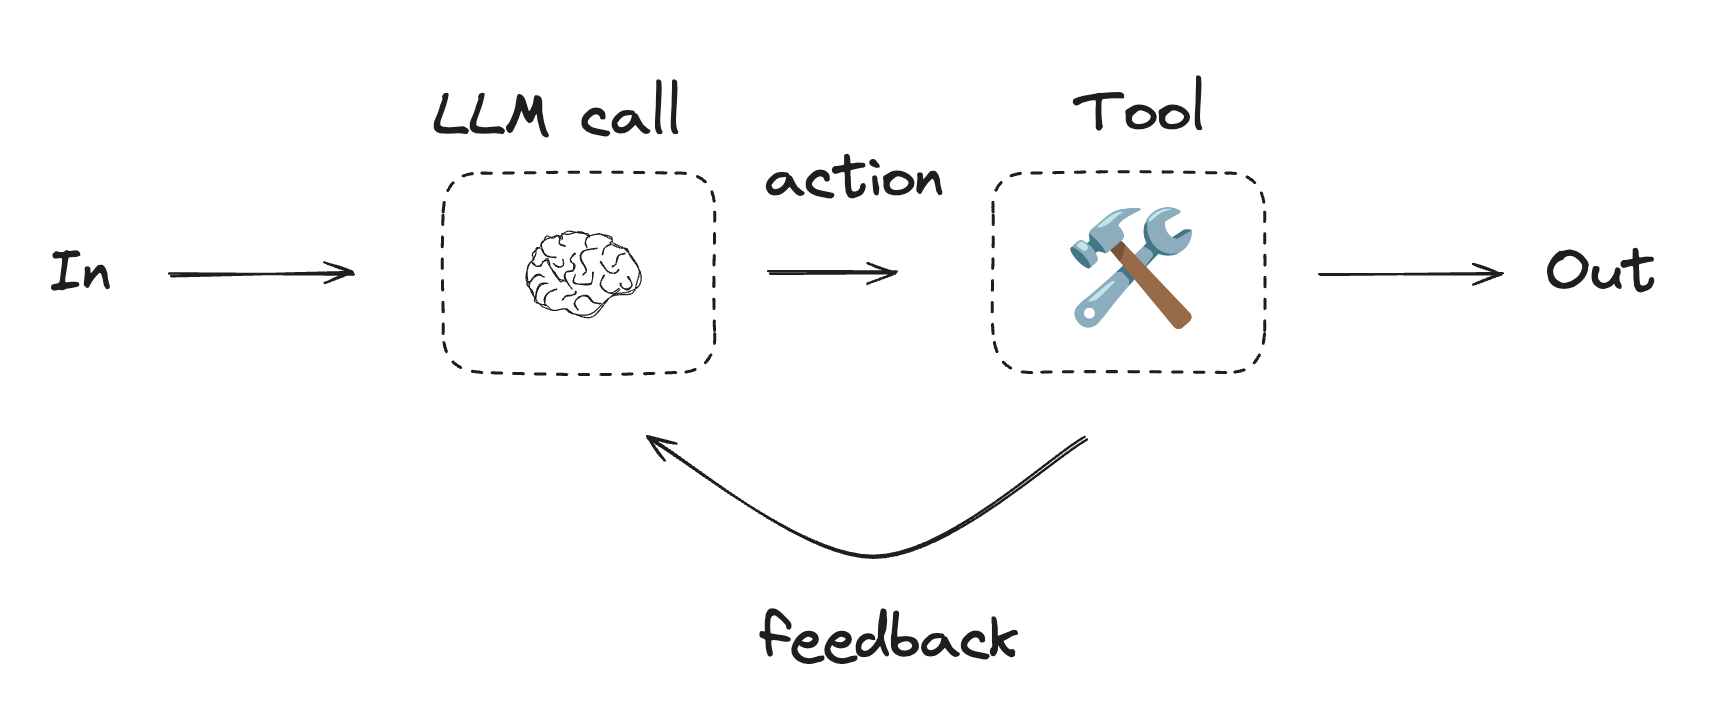
에이전트를 시작하려면 퀵스타트를 참조하거나 LangChain에서 에이전트가 작동하는 방식에 대해 자세히 읽어보세요.
Using tools
Copy
from langchain.tools import tool


# 도구 정의
@tool
def multiply(a: int, b: int) -> int:
    """Multiply `a` and `b`.

    Args:
        a: First int
        b: Second int
    """
    return a * b


@tool
def add(a: int, b: int) -> int:
    """Adds `a` and `b`.

    Args:
        a: First int
        b: Second int
    """
    return a + b


@tool
def divide(a: int, b: int) -> float:
    """Divide `a` and `b`.

    Args:
        a: First int
        b: Second int
    """
    return a / b


# 도구로 LLM 확장
tools = [add, multiply, divide]
tools_by_name = {tool.name: tool for tool in tools}
llm_with_tools = llm.bind_tools(tools)
Copy
from langgraph.graph import MessagesState
from langchain.messages import SystemMessage, HumanMessage, ToolMessage


# 노드
def llm_call(state: MessagesState):
    """LLM이 도구를 호출할지 여부를 결정"""

    return {
        "messages": [
            llm_with_tools.invoke(
                [
                    SystemMessage(
                        content="You are a helpful assistant tasked with performing arithmetic on a set of inputs."
                    )
                ]
                + state["messages"]
            )
        ]
    }


def tool_node(state: dict):
    """도구 호출 수행"""

    result = []
    for tool_call in state["messages"][-1].tool_calls:
        tool = tools_by_name[tool_call["name"]]
        observation = tool.invoke(tool_call["args"])
        result.append(ToolMessage(content=observation, tool_call_id=tool_call["id"]))
    return {"messages": result}


# LLM이 도구를 호출했는지 여부에 따라 도구 노드로 라우팅하거나 종료하는 조건부 엣지 함수
def should_continue(state: MessagesState) -> Literal["tool_node", END]:
    """LLM이 도구를 호출했는지 여부에 따라 루프를 계속할지 중지할지 결정"""

    messages = state["messages"]
    last_message = messages[-1]

    # LLM이 도구를 호출하면 작업 수행
    if last_message.tool_calls:
        return "tool_node"

    # 그렇지 않으면 중지(사용자에게 응답)
    return END


# 워크플로우 구축
agent_builder = StateGraph(MessagesState)

# 노드 추가
agent_builder.add_node("llm_call", llm_call)
agent_builder.add_node("tool_node", tool_node)

# 노드를 연결하는 엣지 추가
agent_builder.add_edge(START, "llm_call")
agent_builder.add_conditional_edges(
    "llm_call",
    should_continue,
    ["tool_node", END]
)
agent_builder.add_edge("tool_node", "llm_call")

# 에이전트 컴파일
agent = agent_builder.compile()

# 에이전트 표시
display(Image(agent.get_graph(xray=True).draw_mermaid_png()))

# 실행
messages = [HumanMessage(content="Add 3 and 4.")]
messages = agent.invoke({"messages": messages})
for m in messages["messages"]:
    m.pretty_print()
Connect these docs programmatically to Claude, VSCode, and more via MCP for real-time answers.