LangSmith pytest 플러그인을 사용하면 Python 개발자가 데이터셋과 평가를 pytest 테스트 케이스로 정의할 수 있습니다. 표준 평가 플로우와 비교했을 때, 다음과 같은 경우에 유용합니다:
- 각 예제마다 다른 평가 로직이 필요한 경우
- 이진 기댓값을 assert하고, 이러한 assertion을 LangSmith에서 추적하면서 동시에 로컬(예: CI 파이프라인)에서 assertion 에러를 발생시키려는 경우
- pytest와 유사한 터미널 출력을 원하는 경우
- 이미 pytest를 사용하여 앱을 테스트하고 있으며 LangSmith 추적을 추가하려는 경우
pytest 통합은 베타 버전이며 향후 릴리스에서 변경될 수 있습니다.
langsmith>=0.3.4가 필요합니다.
풍부한 터미널 출력 및 테스트 캐싱과 같은 추가 기능을 사용하려면 다음과 같이 설치하세요:
pip install -U "langsmith[pytest]"
테스트 정의 및 실행
pytest 통합을 사용하면 데이터셋과 평가자를 테스트 케이스로 정의할 수 있습니다.
LangSmith에서 테스트를 추적하려면 @pytest.mark.langsmith 데코레이터를 추가하세요. 데코레이트된 모든 테스트 케이스는 데이터셋 예제와 동기화됩니다. 테스트 스위트를 실행하면 데이터셋이 업데이트되고 각 테스트 케이스에 대한 하나의 결과를 포함하는 새로운 실험이 생성됩니다.
###################### my_app/main.py ######################
import openai
from langsmith import traceable, wrappers

oai_client = wrappers.wrap_openai(openai.OpenAI())

@traceable
def generate_sql(user_query: str) -> str:
    result = oai_client.chat.completions.create(
        model="gpt-4o-mini",
        messages=[
            {"role": "system", "content": "Convert the user query to a SQL query."},
            {"role": "user", "content": user_query},
        ],
    )
    return result.choices[0].message.content

###################### tests/test_my_app.py ######################
import pytest
from langsmith import testing as t

def is_valid_sql(query: str) -> bool:
    """Return True if the query is valid SQL."""
    return True  # Dummy implementation

@pytest.mark.langsmith  # <-- Mark as a LangSmith test case
def test_sql_generation_select_all() -> None:
    user_query = "Get all users from the customers table"
    t.log_inputs({"user_query": user_query})  # <-- Log example inputs, optional
    expected = "SELECT * FROM customers;"
    t.log_reference_outputs({"sql": expected})  # <-- Log example reference outputs, optional

    sql = generate_sql(user_query)
    t.log_outputs({"sql": sql})  # <-- Log run outputs, optional

    t.log_feedback(key="valid_sql", score=is_valid_sql(sql))  # <-- Log feedback, optional
    assert sql == expected  # <-- Test pass/fail status automatically logged to LangSmith under 'pass' feedback key
pass 불린 피드백 키가 생성됩니다. 또한 로깅한 입력, 출력 및 참조(예상) 출력도 추적합니다.
평소처럼 pytest를 사용하여 테스트를 실행하세요:
대부분의 경우 테스트 스위트 이름을 설정하는 것을 권장합니다:
LANGSMITH_TEST_SUITE='SQL app tests' pytest tests/
- 각 테스트 파일에 대한 데이터셋을 생성합니다. 이 테스트 파일에 대한 데이터셋이 이미 존재하는 경우 업데이트됩니다
- 생성/업데이트된 각 데이터셋에서 실험을 생성합니다
- 로깅한 입력, 출력, 참조 출력 및 피드백과 함께 각 테스트 케이스에 대한 실험 행을 생성합니다
- 각 테스트 케이스에 대한
pass 피드백 키 아래 통과/실패율을 수집합니다
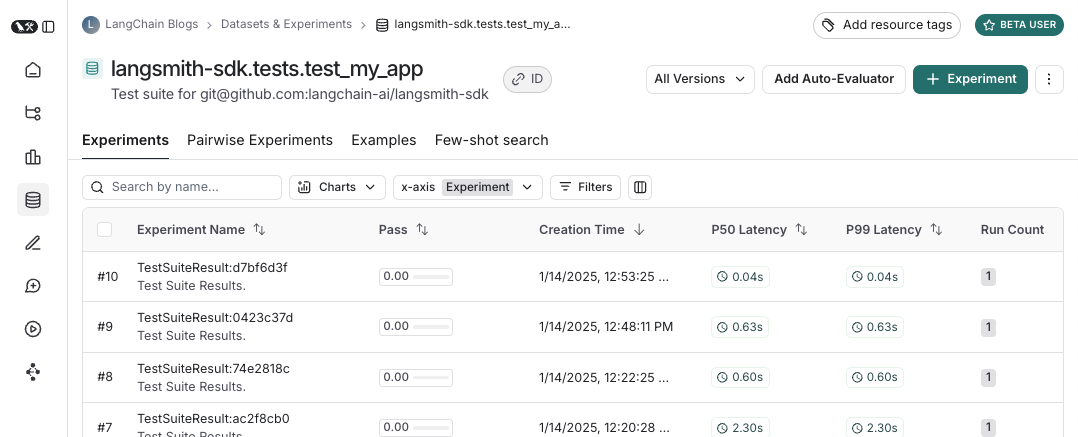
다음은 테스트 스위트 데이터셋의 모습입니다:
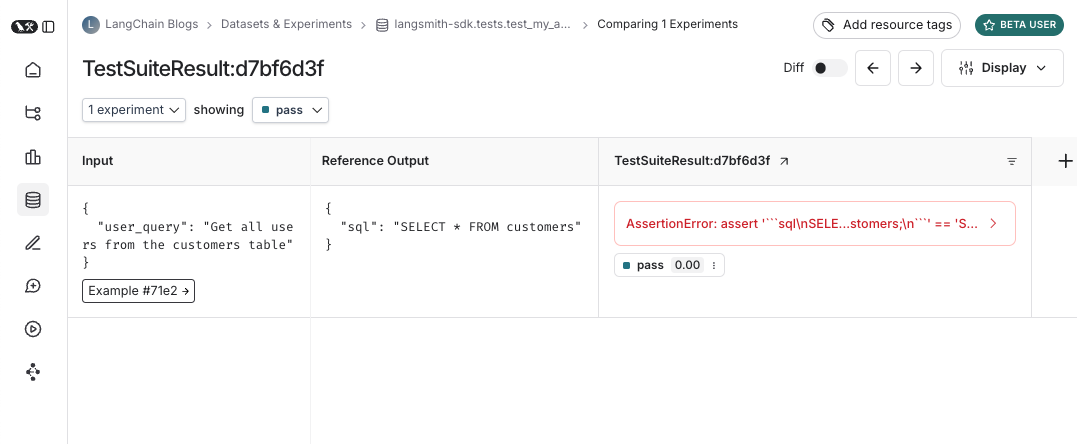
 그리고 해당 테스트 스위트에 대한 실험의 모습은 다음과 같습니다:
입력, 출력 및 참조 출력 로깅
테스트를 실행할 때마다 데이터셋 예제와 동기화하고 실행으로 추적합니다. 예제 입력 및 참조 출력, 그리고 실행 출력을 추적할 수 있는 몇 가지 방법이 있습니다. 가장 간단한 방법은 log_inputs, log_outputs, log_reference_outputs 메서드를 사용하는 것입니다. 테스트 중 언제든지 이러한 메서드를 실행하여 해당 테스트의 예제 및 실행을 업데이트할 수 있습니다:
import pytest
from langsmith import testing as t

@pytest.mark.langsmith
def test_foo() -> None:
    t.log_inputs({"a": 1, "b": 2})
    t.log_reference_outputs({"foo": "bar"})
    t.log_outputs({"foo": "baz"})
    assert True
{"a": 1, "b": 2}, 참조 출력은 {"foo": "bar"}이며, 출력이 {"foo": "baz"}인 실행이 추적됩니다.
참고: log_inputs, log_outputs 또는 log_reference_outputs를 두 번 실행하면 이전 값이 덮어씌워집니다.
예제 입력 및 참조 출력을 정의하는 또 다른 방법은 pytest fixture/parametrization을 사용하는 것입니다. 기본적으로 테스트 함수의 모든 인수는 해당 예제의 입력으로 로깅됩니다. 특정 인수가 참조 출력을 나타내는 경우, @pytest.mark.langsmith(output_keys=["name_of_ref_output_arg"])를 사용하여 해당 인수가 참조 출력으로 로깅되도록 지정할 수 있습니다:
import pytest

@pytest.fixture
def c() -> int:
    return 5

@pytest.fixture
def d() -> int:
    return 6

@pytest.mark.langsmith(output_keys=["d"])
def test_cd(c: int, d: int) -> None:
    result = 2 * c
    t.log_outputs({"d": result})  # Log run outputs
    assert result == d
{"c": 5}, 참조 출력이 {"d": 6}, 실행 출력이 {"d": 10}인 예제가 생성/동기화됩니다.
피드백 로깅
기본적으로 LangSmith는 각 테스트 케이스에 대한 pass 피드백 키 아래 통과/실패율을 수집합니다. log_feedback을 사용하여 추가 피드백을 추가할 수 있습니다.
import openai
import pytest
from langsmith import wrappers
from langsmith import testing as t

oai_client = wrappers.wrap_openai(openai.OpenAI())

@pytest.mark.langsmith
def test_offtopic_input() -> None:
    user_query = "whats up"
    t.log_inputs({"user_query": user_query})

    sql = generate_sql(user_query)
    t.log_outputs({"sql": sql})

    expected = "Sorry that is not a valid query."
    t.log_reference_outputs({"sql": expected})

    # Use this context manager to trace any steps used for generating evaluation
    # feedback separately from the main application logic
    with t.trace_feedback():
        instructions = (
            "Return 1 if the ACTUAL and EXPECTED answers are semantically equivalent, "
            "otherwise return 0. Return only 0 or 1 and nothing else."
        )

        grade = oai_client.chat.completions.create(
            model="gpt-4o-mini",
            messages=[
                {"role": "system", "content": instructions},
                {"role": "user", "content": f"ACTUAL: {sql}\nEXPECTED: {expected}"},
            ],
        )
        score = float(grade.choices[0].message.content)
        t.log_feedback(key="correct", score=score)

    assert score
trace_feedback() 컨텍스트 매니저의 사용에 주목하세요. 이를 통해 LLM-as-judge 호출이 테스트 케이스의 나머지 부분과 별도로 추적됩니다. 메인 테스트 케이스 실행에 표시되는 대신 correct 피드백 키에 대한 추적에 표시됩니다.
참고: 피드백 추적과 연결된 log_feedback 호출이 trace_feedback 컨텍스트 내에서 발생하는지 확인하세요. 이렇게 하면 피드백을 추적과 연결할 수 있으며, UI에서 피드백을 볼 때 클릭하여 해당 피드백을 생성한 추적을 확인할 수 있습니다.
중간 호출 추적
LangSmith는 테스트 케이스 실행 과정에서 발생하는 모든 추적 가능한 중간 호출을 자동으로 추적합니다.
테스트를 테스트 스위트로 그룹화
기본적으로 주어진 파일 내의 모든 테스트는 해당 데이터셋이 있는 단일 “테스트 스위트”로 그룹화됩니다. 케이스별 그룹화를 위해 @pytest.mark.langsmith에 test_suite_name 매개변수를 전달하여 테스트가 속한 테스트 스위트를 구성하거나, LANGSMITH_TEST_SUITE 환경 변수를 설정하여 실행의 모든 테스트를 단일 테스트 스위트로 그룹화할 수 있습니다:
LANGSMITH_TEST_SUITE="SQL app tests" pytest tests/
LANGSMITH_TEST_SUITE를 설정하는 것을 권장합니다.
실험 이름 지정
LANGSMITH_EXPERIMENT 환경 변수를 사용하여 실험 이름을 지정할 수 있습니다:
LANGSMITH_TEST_SUITE="SQL app tests" LANGSMITH_EXPERIMENT="baseline" pytest tests/
langsmith[pytest]로 설치하고 환경 변수 LANGSMITH_TEST_CACHE=/my/cache/path를 설정하세요:
pip install -U "langsmith[pytest]"
LANGSMITH_TEST_CACHE=tests/cassettes pytest tests/my_llm_tests
tests/cassettes에 캐시되고 이후 실행 시 거기에서 로드됩니다. 이를 저장소에 체크인하면 CI에서도 캐시를 사용할 수 있습니다.
langsmith>=0.4.10에서는 다음과 같이 개별 URL 또는 호스트명에 대한 요청에 대해 선택적으로 캐싱을 활성화할 수 있습니다:
@pytest.mark.langsmith(cached_hosts=["api.openai.com", "https://api.anthropic.com"])
def my_test():
    ...
pytest 기능
@pytest.mark.langsmith는 방해가 되지 않도록 설계되었으며 익숙한 pytest 기능과 잘 작동합니다.
pytest.mark.parametrize로 매개변수화
이전처럼 parametrize 데코레이터를 사용할 수 있습니다. 이렇게 하면 테스트의 매개변수화된 각 인스턴스에 대해 새로운 테스트 케이스가 생성됩니다.
@pytest.mark.langsmith(output_keys=["expected_sql"])
@pytest.mark.parametrize(
    "user_query, expected_sql",
    [
        ("Get all users from the customers table", "SELECT * FROM customers"),
        ("Get all users from the orders table", "SELECT * FROM orders"),
    ],
)
def test_sql_generation_parametrized(user_query, expected_sql):
    sql = generate_sql(user_query)
    assert sql == expected_sql
evaluate()를 사용하는 것을 고려하세요. 이렇게 하면 평가가 병렬화되고 개별 실험 및 해당 데이터셋을 더 쉽게 제어할 수 있습니다.
pytest-xdist로 병렬화
평소처럼 pytest-xdist를 사용하여 테스트 실행을 병렬화할 수 있습니다:
pip install -U pytest-xdist
pytest -n auto tests
pytest-asyncio를 사용한 비동기 테스트
@pytest.mark.langsmith는 동기 또는 비동기 테스트와 함께 작동하므로 이전과 똑같이 비동기 테스트를 실행할 수 있습니다.
pytest-watch를 사용한 감시 모드
감시 모드를 사용하여 테스트를 빠르게 반복할 수 있습니다. 불필요한 LLM 호출을 피하기 위해 테스트 캐싱(아래 참조)을 활성화한 상태에서만 사용하는 것을 강력히 권장합니다:
pip install pytest-watch
LANGSMITH_TEST_CACHE=tests/cassettes ptw tests/my_llm_tests
풍부한 출력
테스트 실행의 LangSmith 결과를 풍부하게 표시하려면 --langsmith-output을 지정할 수 있습니다:
pytest --langsmith-output tests
langsmith<=0.3.3에서는 --output=langsmith였지만 다른 pytest 플러그인과의 충돌을 피하기 위해 업데이트되었습니다.
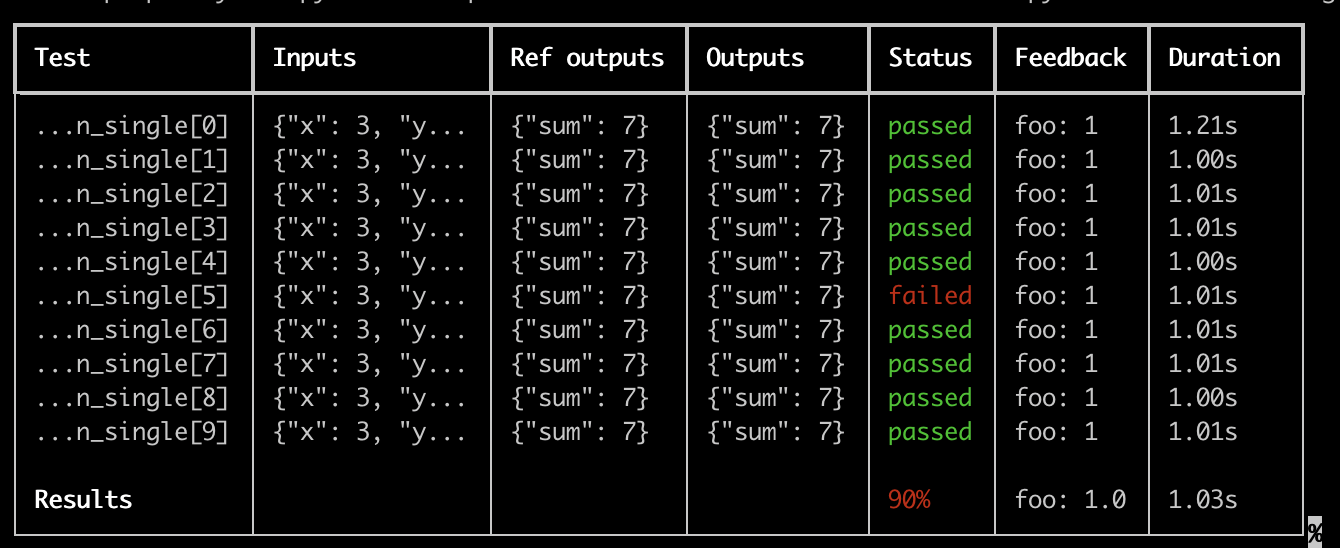
결과가 LangSmith에 업로드될 때 실시간으로 업데이트되는 테스트 스위트당 멋진 테이블을 얻을 수 있습니다:
 이 기능을 사용할 때 몇 가지 중요한 참고 사항:
pip install -U "langsmith[pytest]"를 설치했는지 확인하세요- 풍부한 출력은 현재
pytest-xdist와 함께 작동하지 않습니다
참고: 사용자 지정 출력은 모든 표준 pytest 출력을 제거합니다. 예상치 못한 동작을 디버깅하려는 경우 전체 오류 추적을 확인하기 위해 일반 pytest 출력을 표시하는 것이 더 나은 경우가 많습니다.
드라이런 모드
결과를 LangSmith에 동기화하지 않고 테스트를 실행하려면 환경에서 LANGSMITH_TEST_TRACKING=false를 설정할 수 있습니다.
LANGSMITH_TEST_TRACKING=false pytest tests/
Expectations
LangSmith는 LLM 출력에 대한 기대값을 정의하는 데 도움이 되는 expect 유틸리티를 제공합니다. 예를 들어:
from langsmith import expect

@pytest.mark.langsmith
def test_sql_generation_select_all():
    user_query = "Get all users from the customers table"
    sql = generate_sql(user_query)
    expect(sql).to_contain("customers")
assert하여 테스트 실패를 유발할 수 있습니다.
expect는 “퍼지 매치” 메서드도 제공합니다. 예를 들어:
@pytest.mark.langsmith(output_keys=["expectation"])
@pytest.mark.parametrize(
    "query, expectation",
    [
       ("what's the capital of France?", "Paris"),
    ],
)
def test_embedding_similarity(query, expectation):
    prediction = my_chatbot(query)
    expect.embedding_distance(
        # This step logs the distance as feedback for this run
        prediction=prediction, expectation=expectation
        # Adding a matcher (in this case, 'to_be_*"), logs 'expectation' feedback
    ).to_be_less_than(0.5) # Optional predicate to assert against

    expect.edit_distance(
        # This computes the normalized Damerau-Levenshtein distance between the two strings
        prediction=prediction, expectation=expectation
        # If no predicate is provided below, 'assert' isn't called, but the score is still logged
    )
- 예측과 기대값 사이의
embedding_distance
- 이진
expectation 점수(코사인 거리가 0.5 미만이면 1, 그렇지 않으면 0)
- 예측과 기대값 사이의
edit_distance
- 전체 테스트 통과/실패 점수(이진)
expect 유틸리티는 Jest의 expect API를 모델로 하며, LLM을 더 쉽게 평가할 수 있도록 기본 제공 기능을 제공합니다.
레거시
@test / @unit 데코레이터
테스트 케이스를 표시하는 레거시 방법은 @test 또는 @unit 데코레이터를 사용하는 것입니다:
from langsmith import test

@test
def test_foo() -> None:
    pass

